Scheduled Events
Scheduled Events let you set up a live broadcast in advance so your audience knows exactly when to tune in. Create the event once in Switchboard, and Switchboard publishes an upcoming-event announcement on each supported destination, giving you a shareable link to promote in newsletters, on your website, or across social media.
Last updated 13 days ago
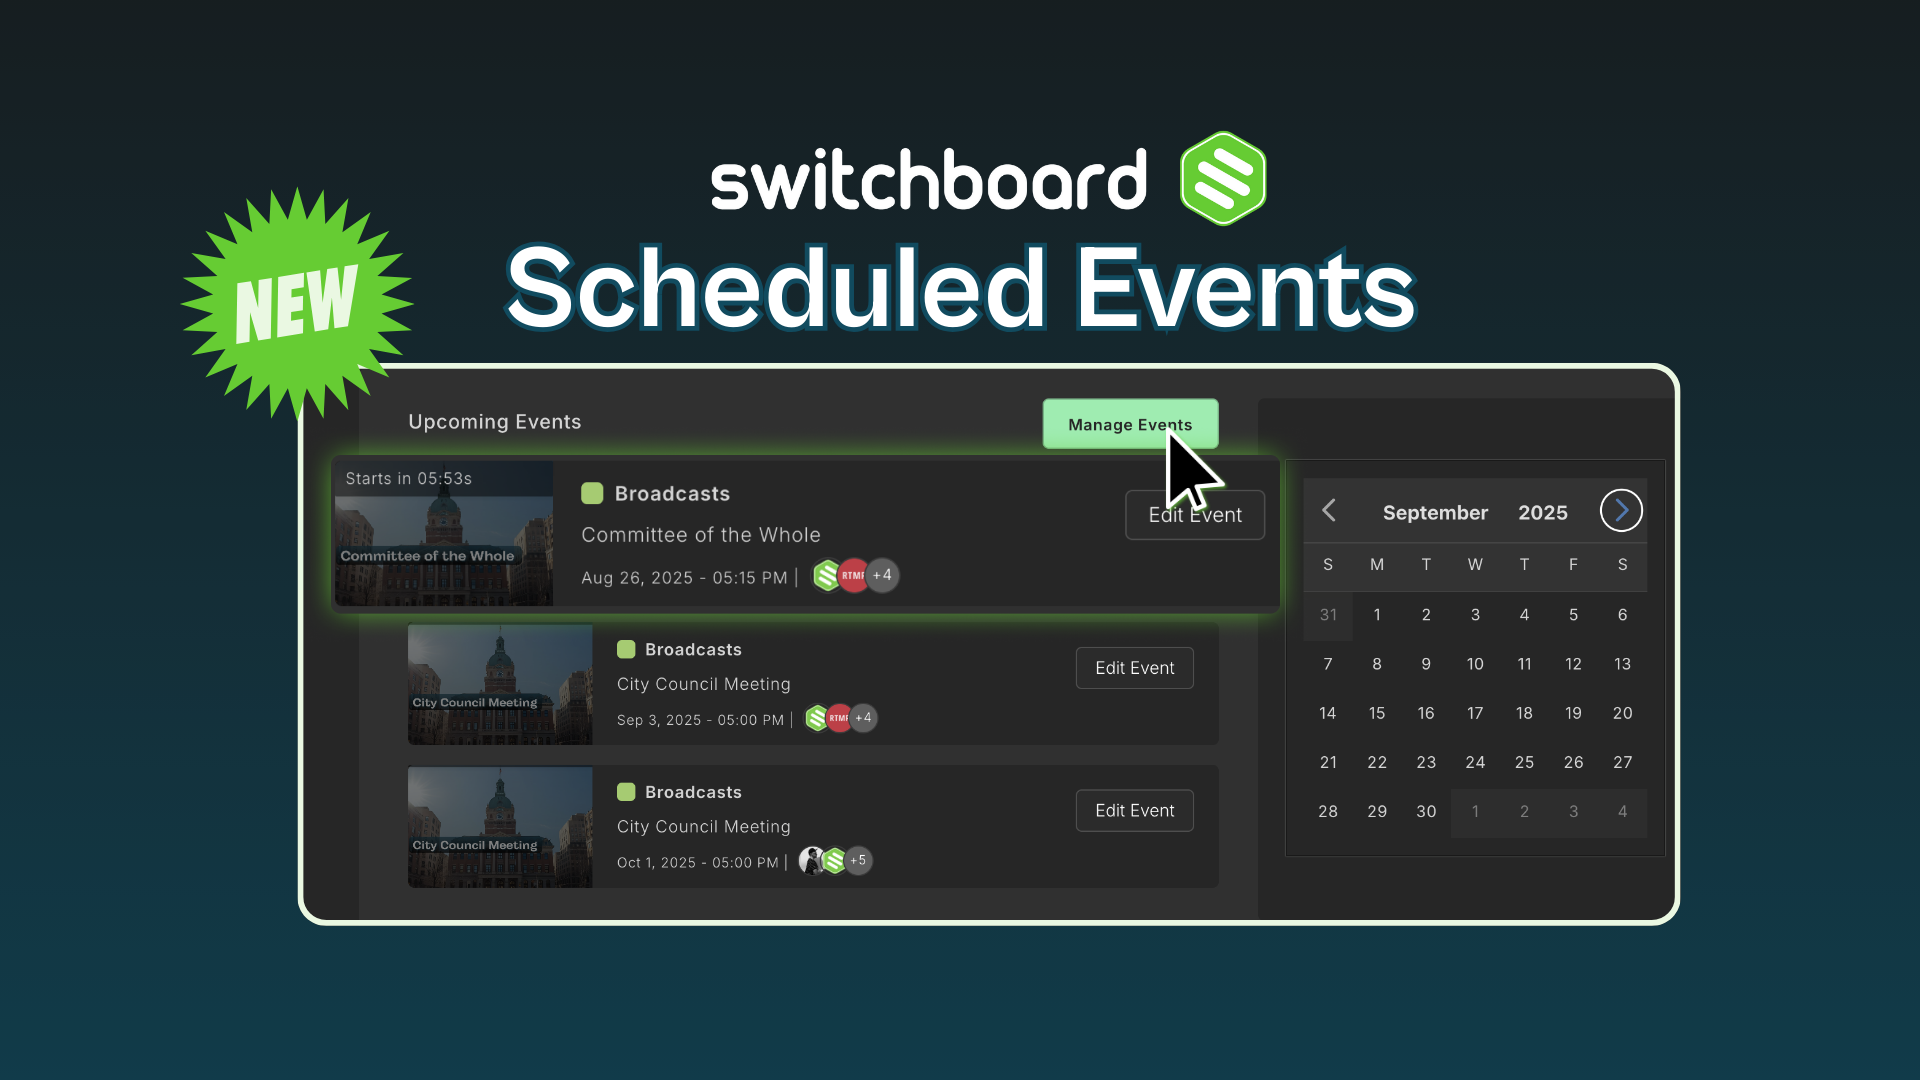
New: Scheduled Events now support YouTube, Facebook Pages, LinkedIn, and X, including Partner Destinations.
Add any of these destinations to a Scheduled Event, and Switchboard will create an announcement on each platform ahead of your broadcast. When you click Start Streaming, your live video publishes to those same posts, so viewers who saw the announcement land right on your stream.
How to Create a Scheduled Event
You can start creating a scheduled event in two ways. Creating from a Workflow is best when you are already working within a specific Workflow. Using the Events Page manager is ideal for getting an overview of all your upcoming events.
Good to Know Before You Start
Supported platforms for announcements: YouTube, Facebook Pages, LinkedIn, and X. This applies to both your own destinations and Partner Destinations.
Facebook Pages only. Facebook Profiles and Groups aren't supported for Scheduled Event announcements right now.
Other destinations still work. You can add any Destination type to a Scheduled Event and go live to it; only the platforms above create an announcement post.
Scheduled Events don't start automatically. You start the broadcast yourself by clicking Start Streaming. Autostart does not apply to Scheduled Events.
You can start up to 30 minutes early. The Start Streaming button turns green 30 minutes before the scheduled time once Switchboard is receiving video from your encoder. (The only exception is LinkedIn. LinkedIn only allows you to do so within 15 minutes of the start time)
Path 1: Start from a Workflow
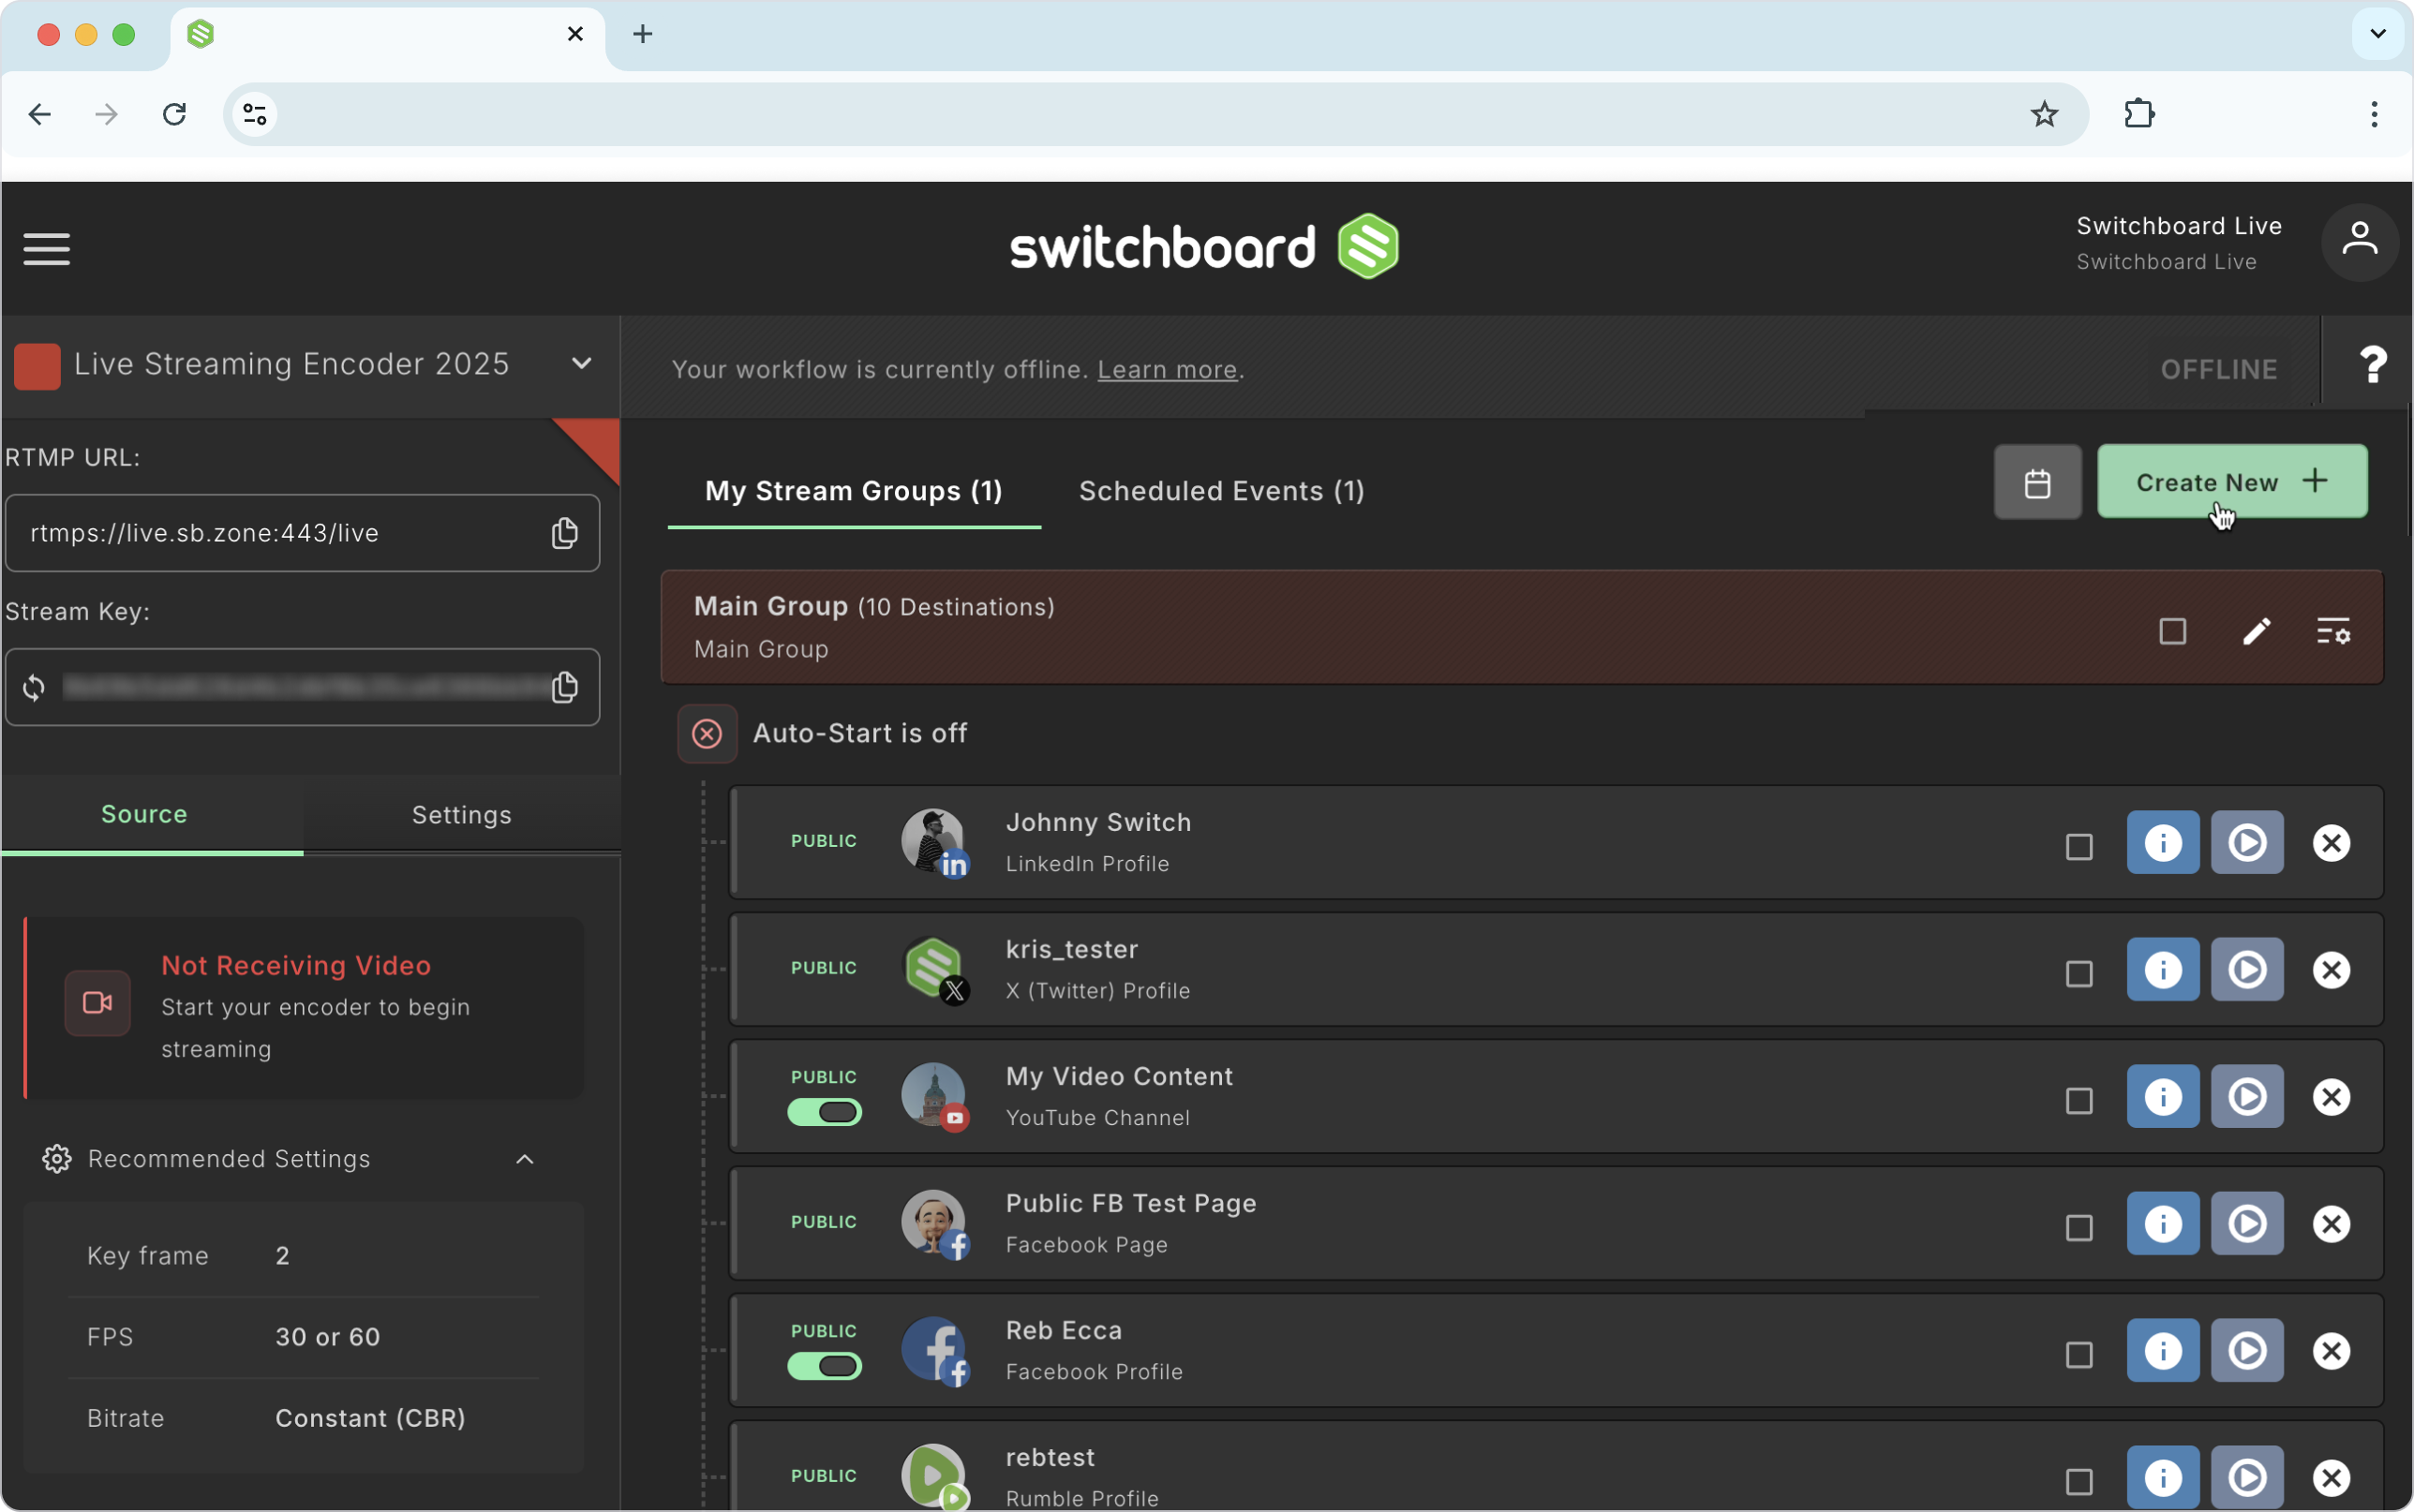
Navigate to the desired workflow page and click Create New.
Select Scheduled Event. A new window will open.
Proceed to the "Filling out the Event Details" section below.
Path 2: Start from the Events Page Manager
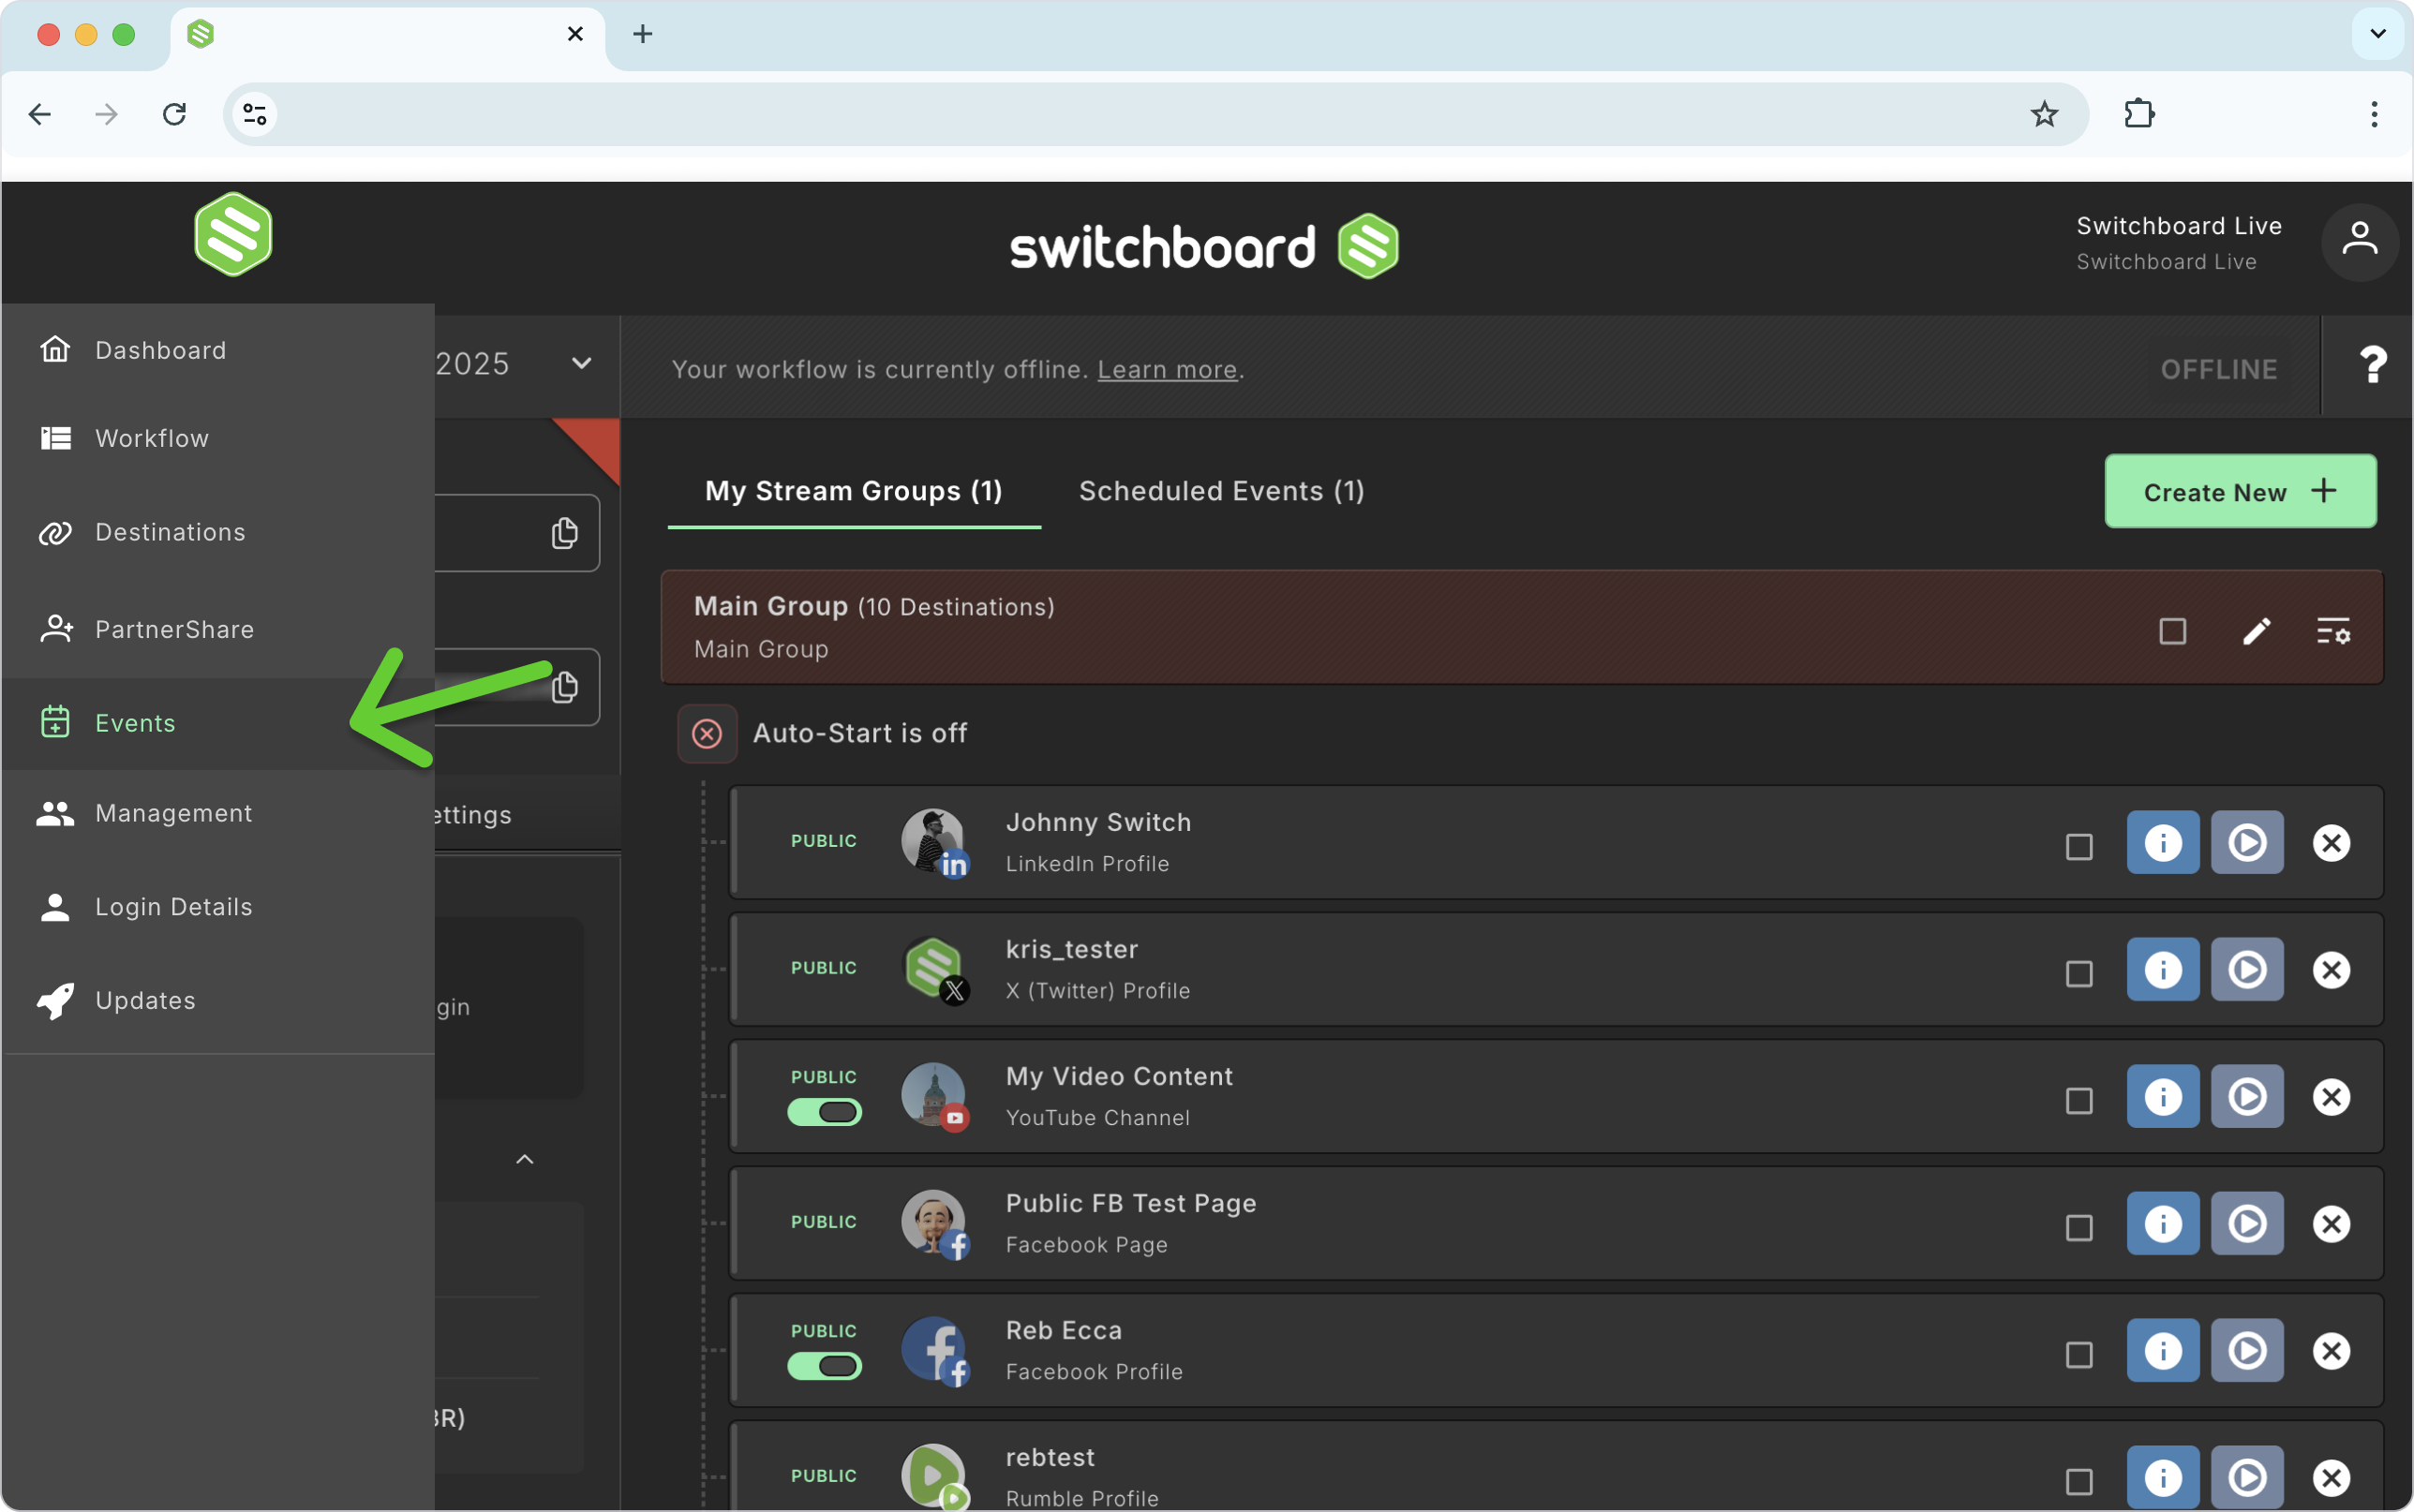
Navigate to the Events Page Manager from the main dashboard or side menu.
Click "New Event" in the top right. A pop-up window will open.
Proceed to the "Filling out the Event Details" section below.
Filling out the Event Details
Event Name: This is for your internal reference only and will not be published. Use it to keep your events organized.
Select the Stream Source (Events Page Manager Only): If you're creating from the Events Page Manager, select the workflow you’ll use.
Enter the Stream Title and Description.
Enter Start Date and Time.
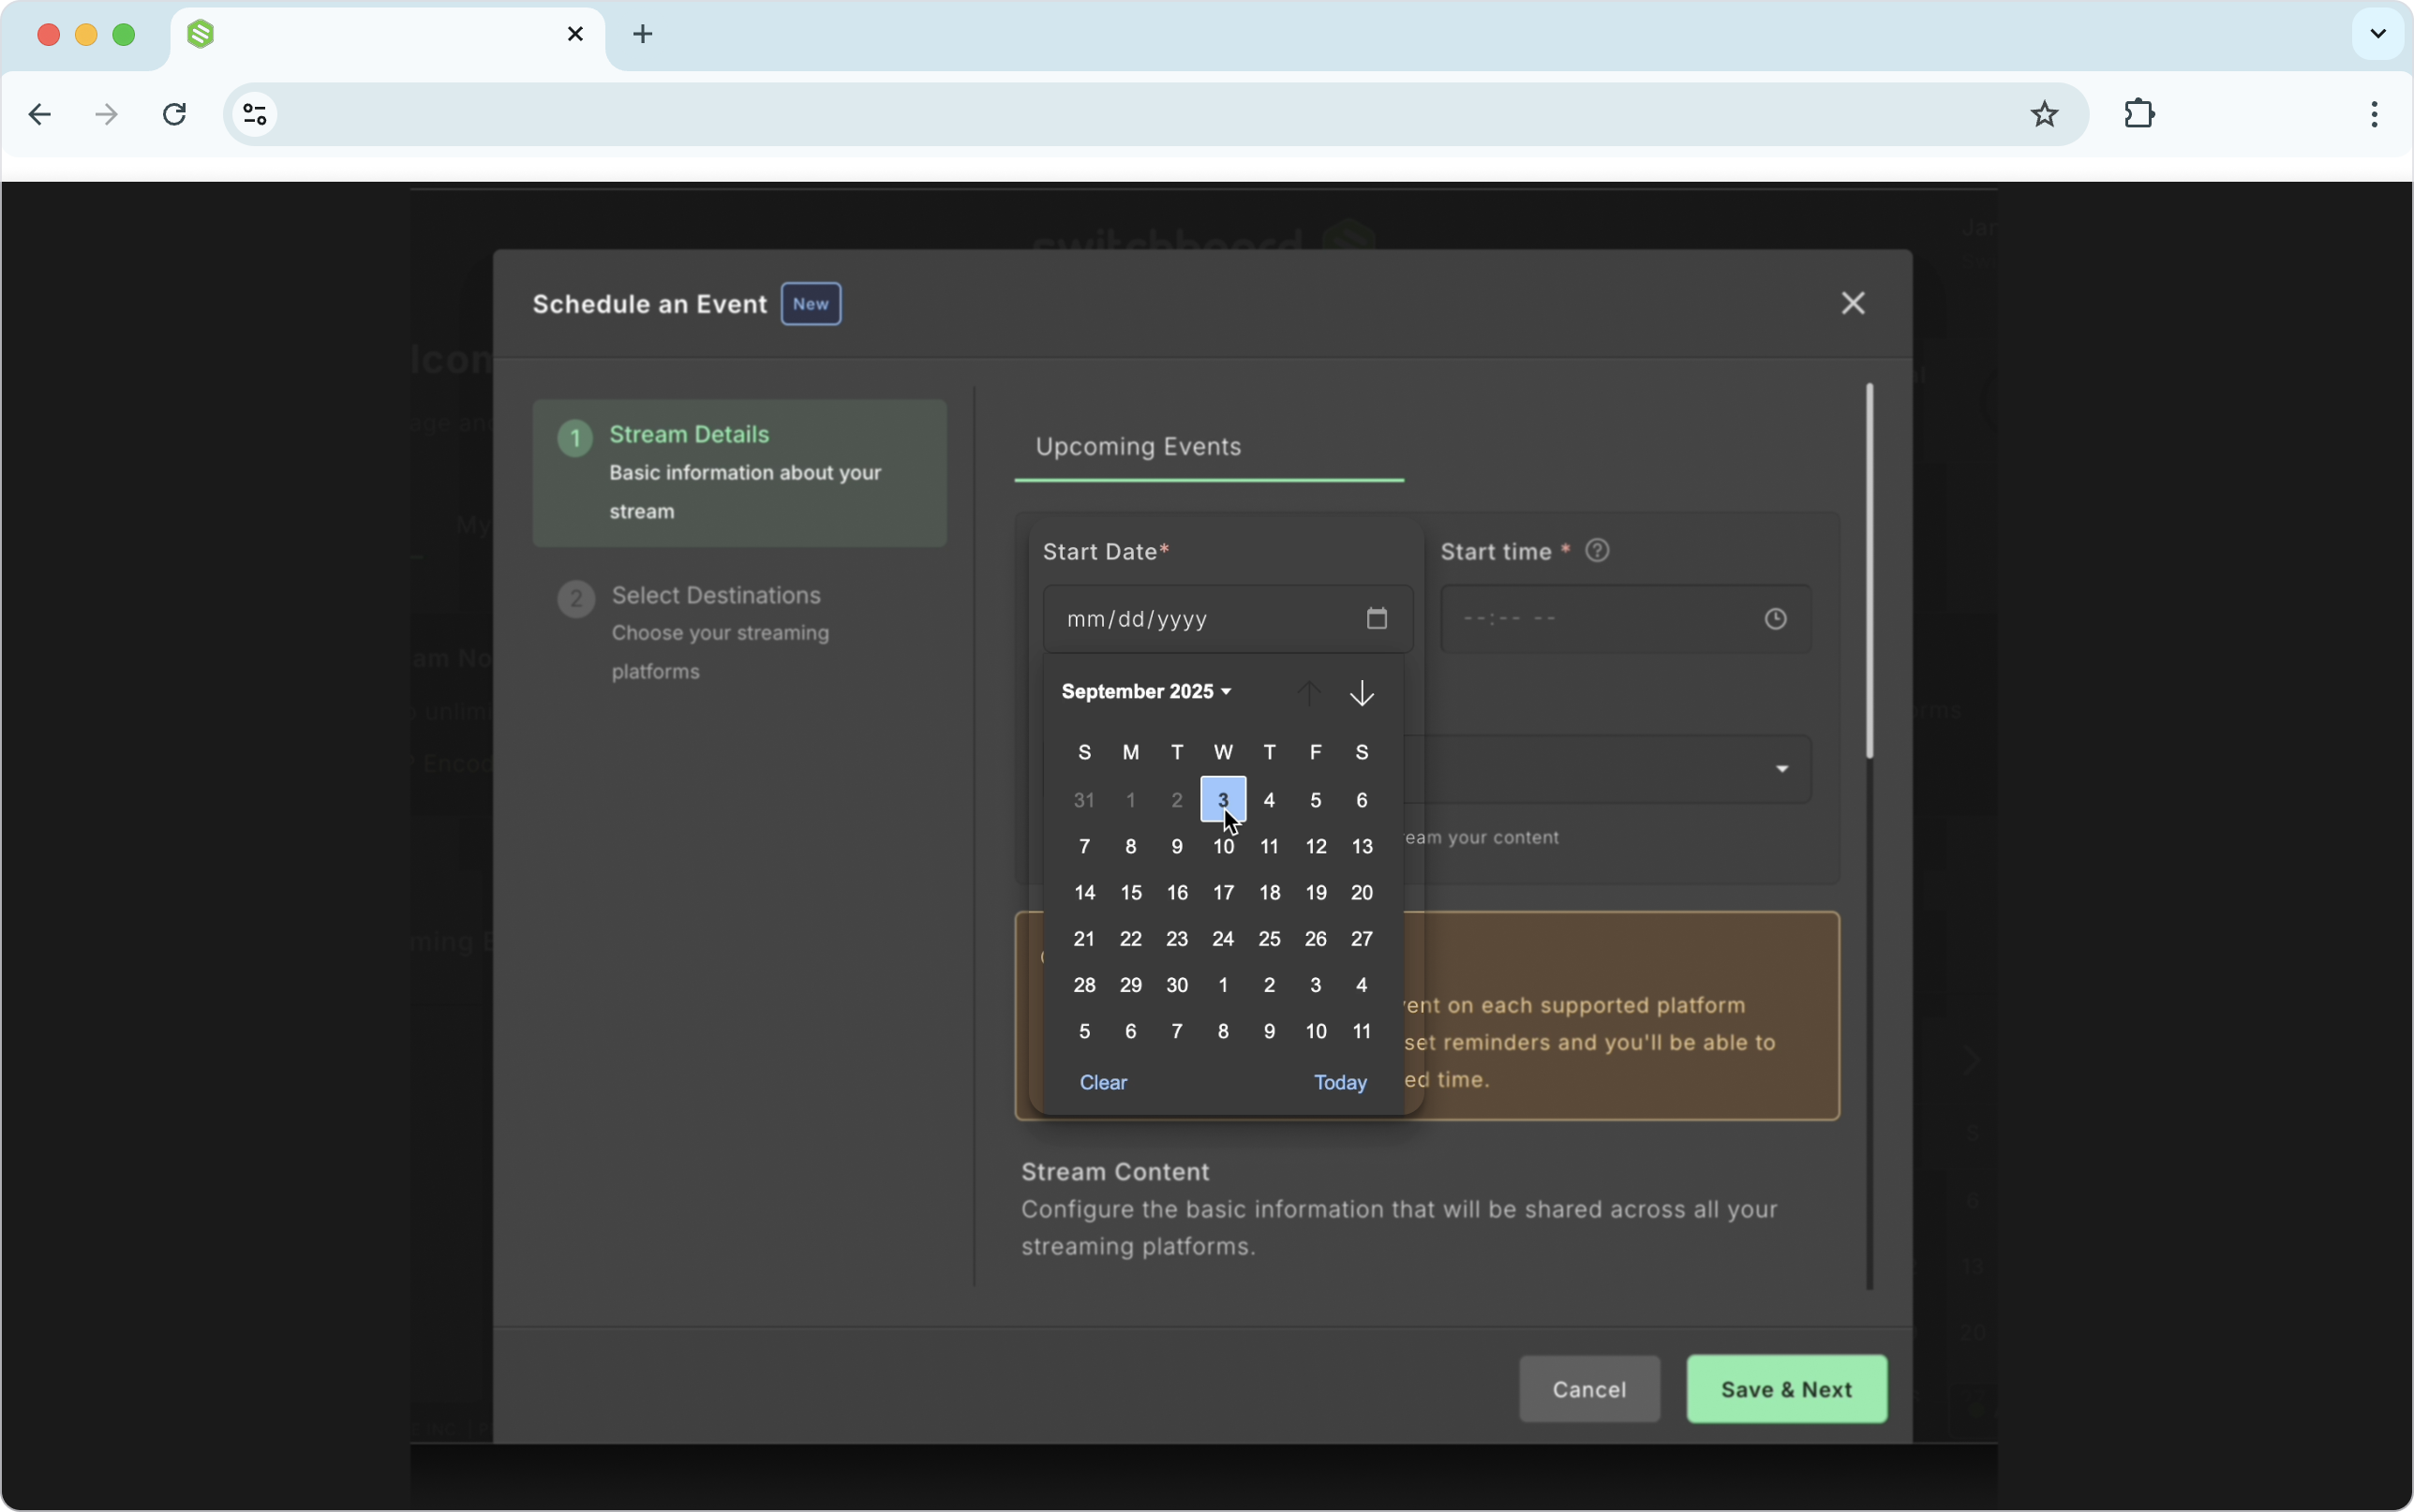
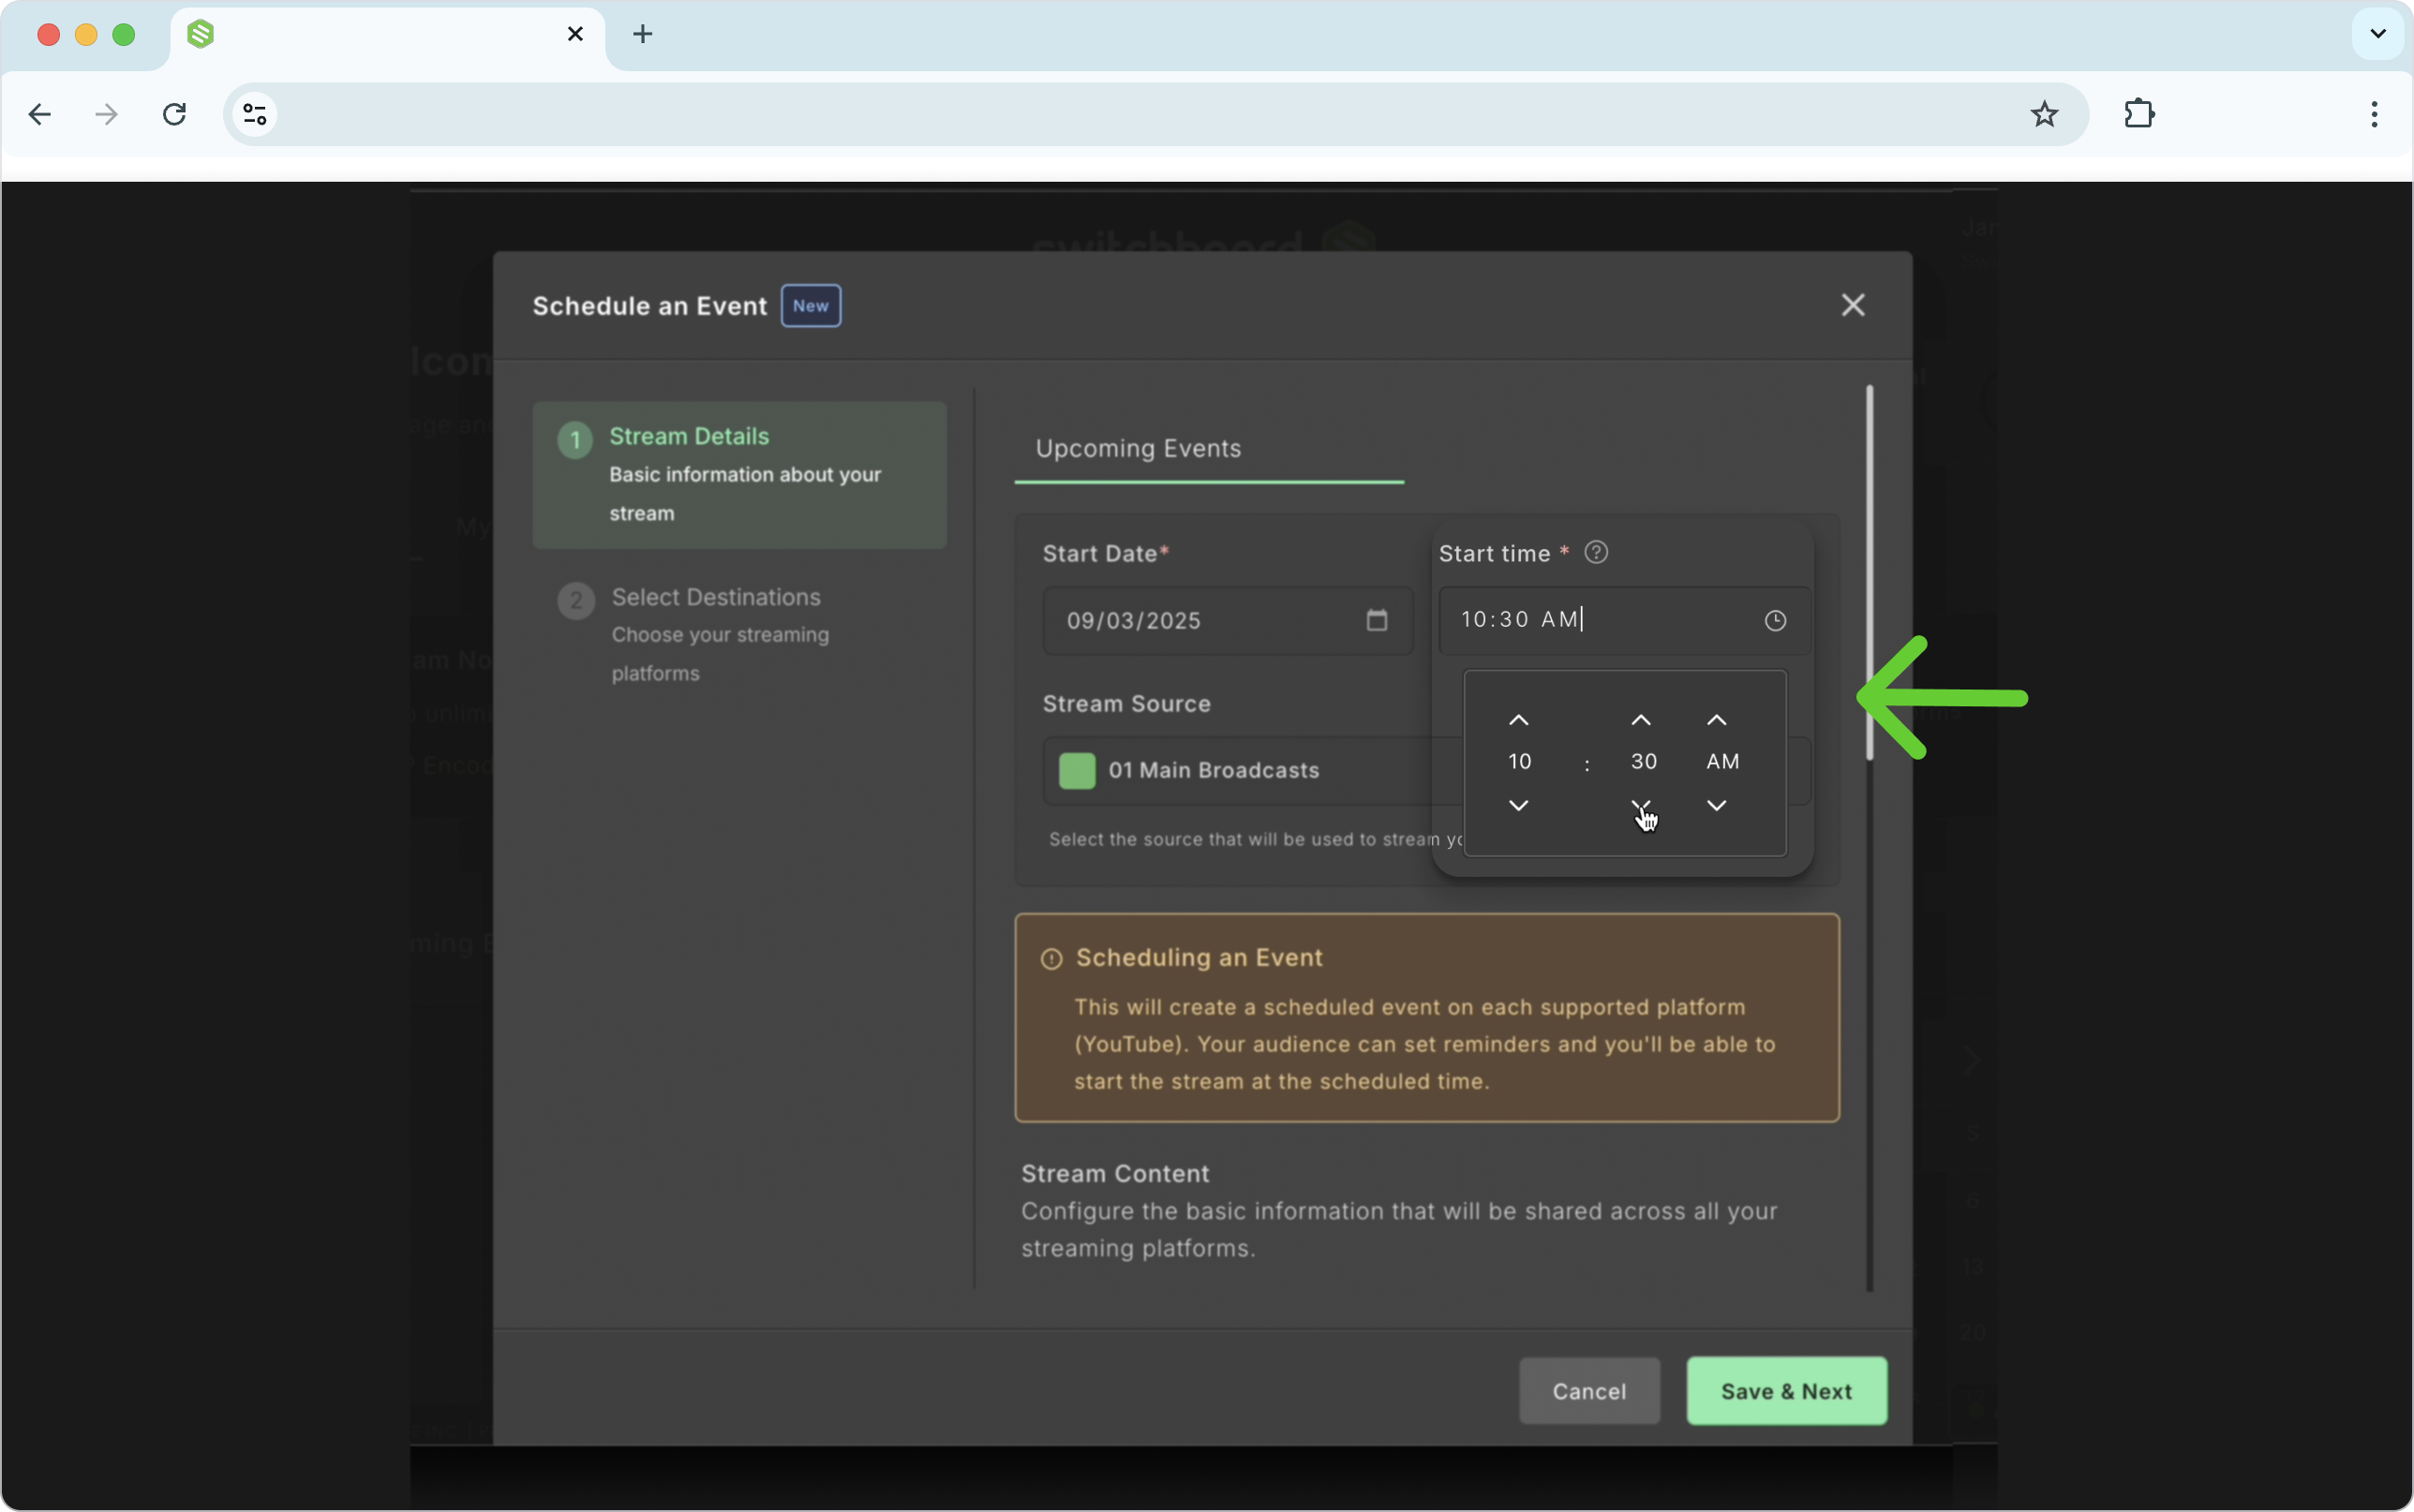
Provide a thumbnail. If you don’t provide one, a default thumbnail will be created for you.
Note on Thumbnails: Here’s how to change the Thumbnail.
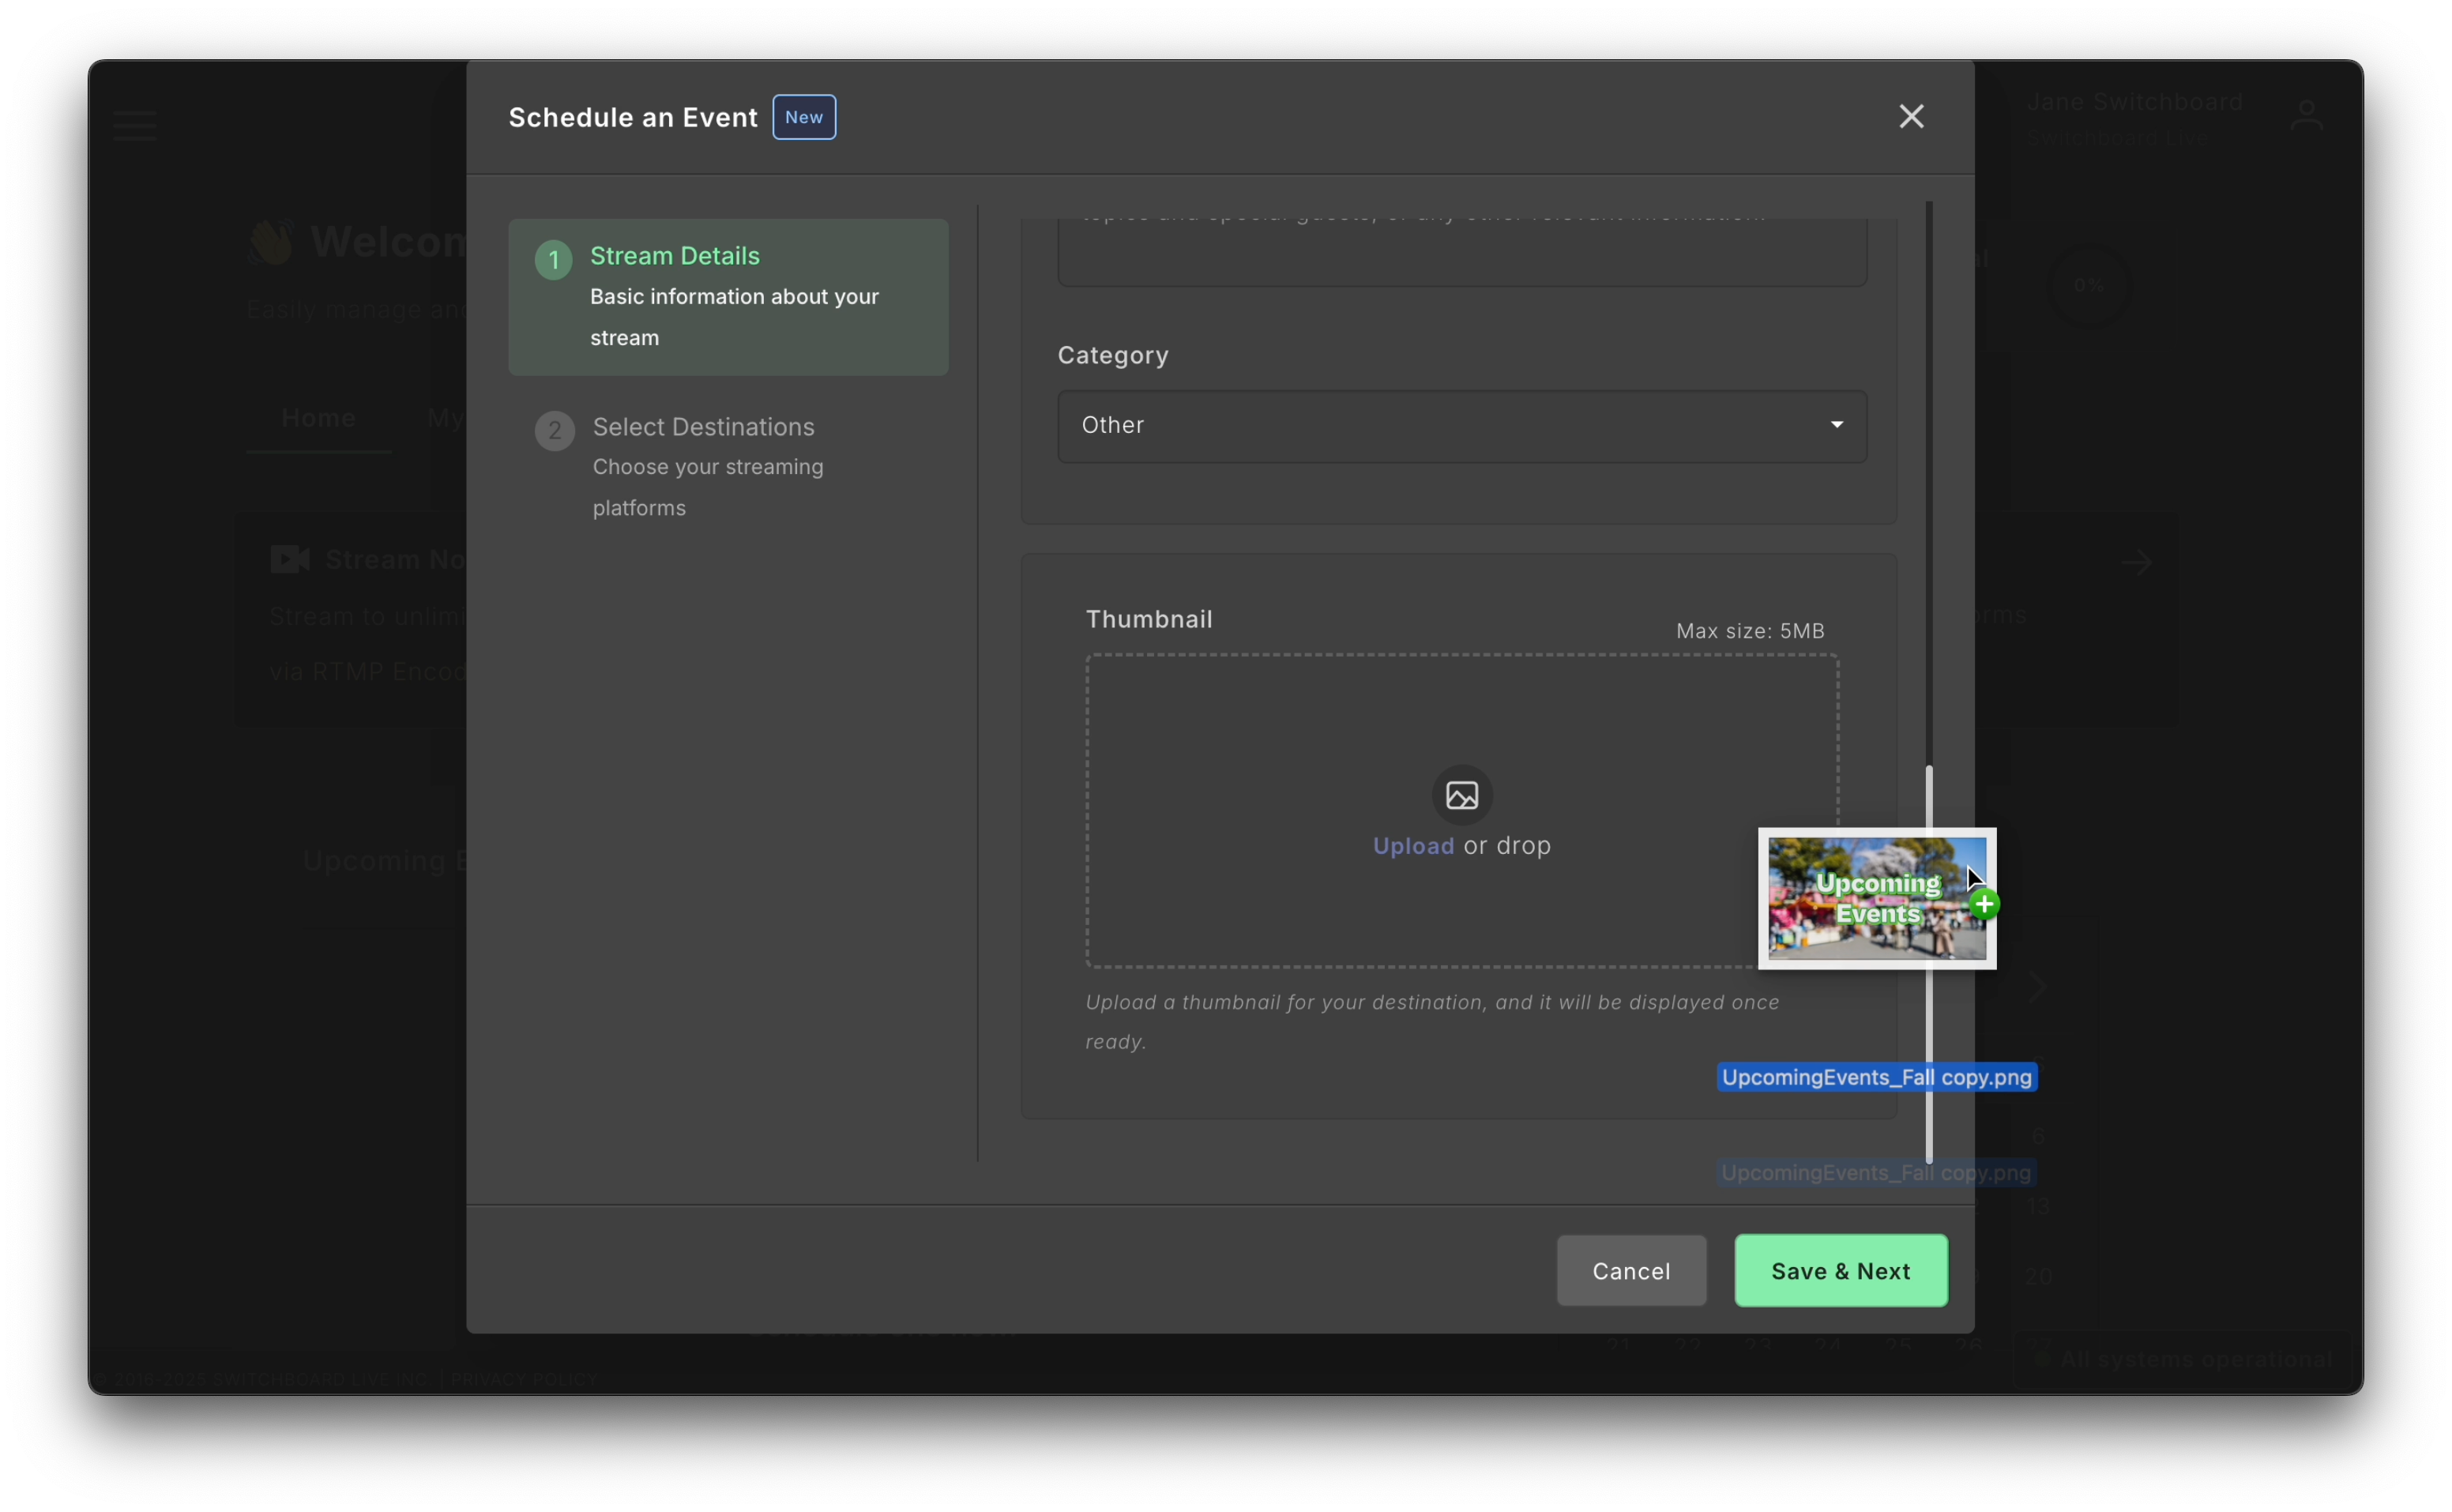
Click Save and Next.
Add Destinations to the Scheduled Event
Use the toggle button to add destinations that have already been saved to the Switchboard Account, or click Connect more to link to new socials to the Switchboard account.
Add YouTube channel, Facebook Page, LinkedIn, and X destinations, and posts will be created on the respective platforms. When you go live, the live video will publish as a post. Note: You can add any Destination type to the Scheduled Event group and go live; only X, YouTube, LinkedIn, and Facebook Pages will create an announcement post.
Click Save and Next
Partner Destinations
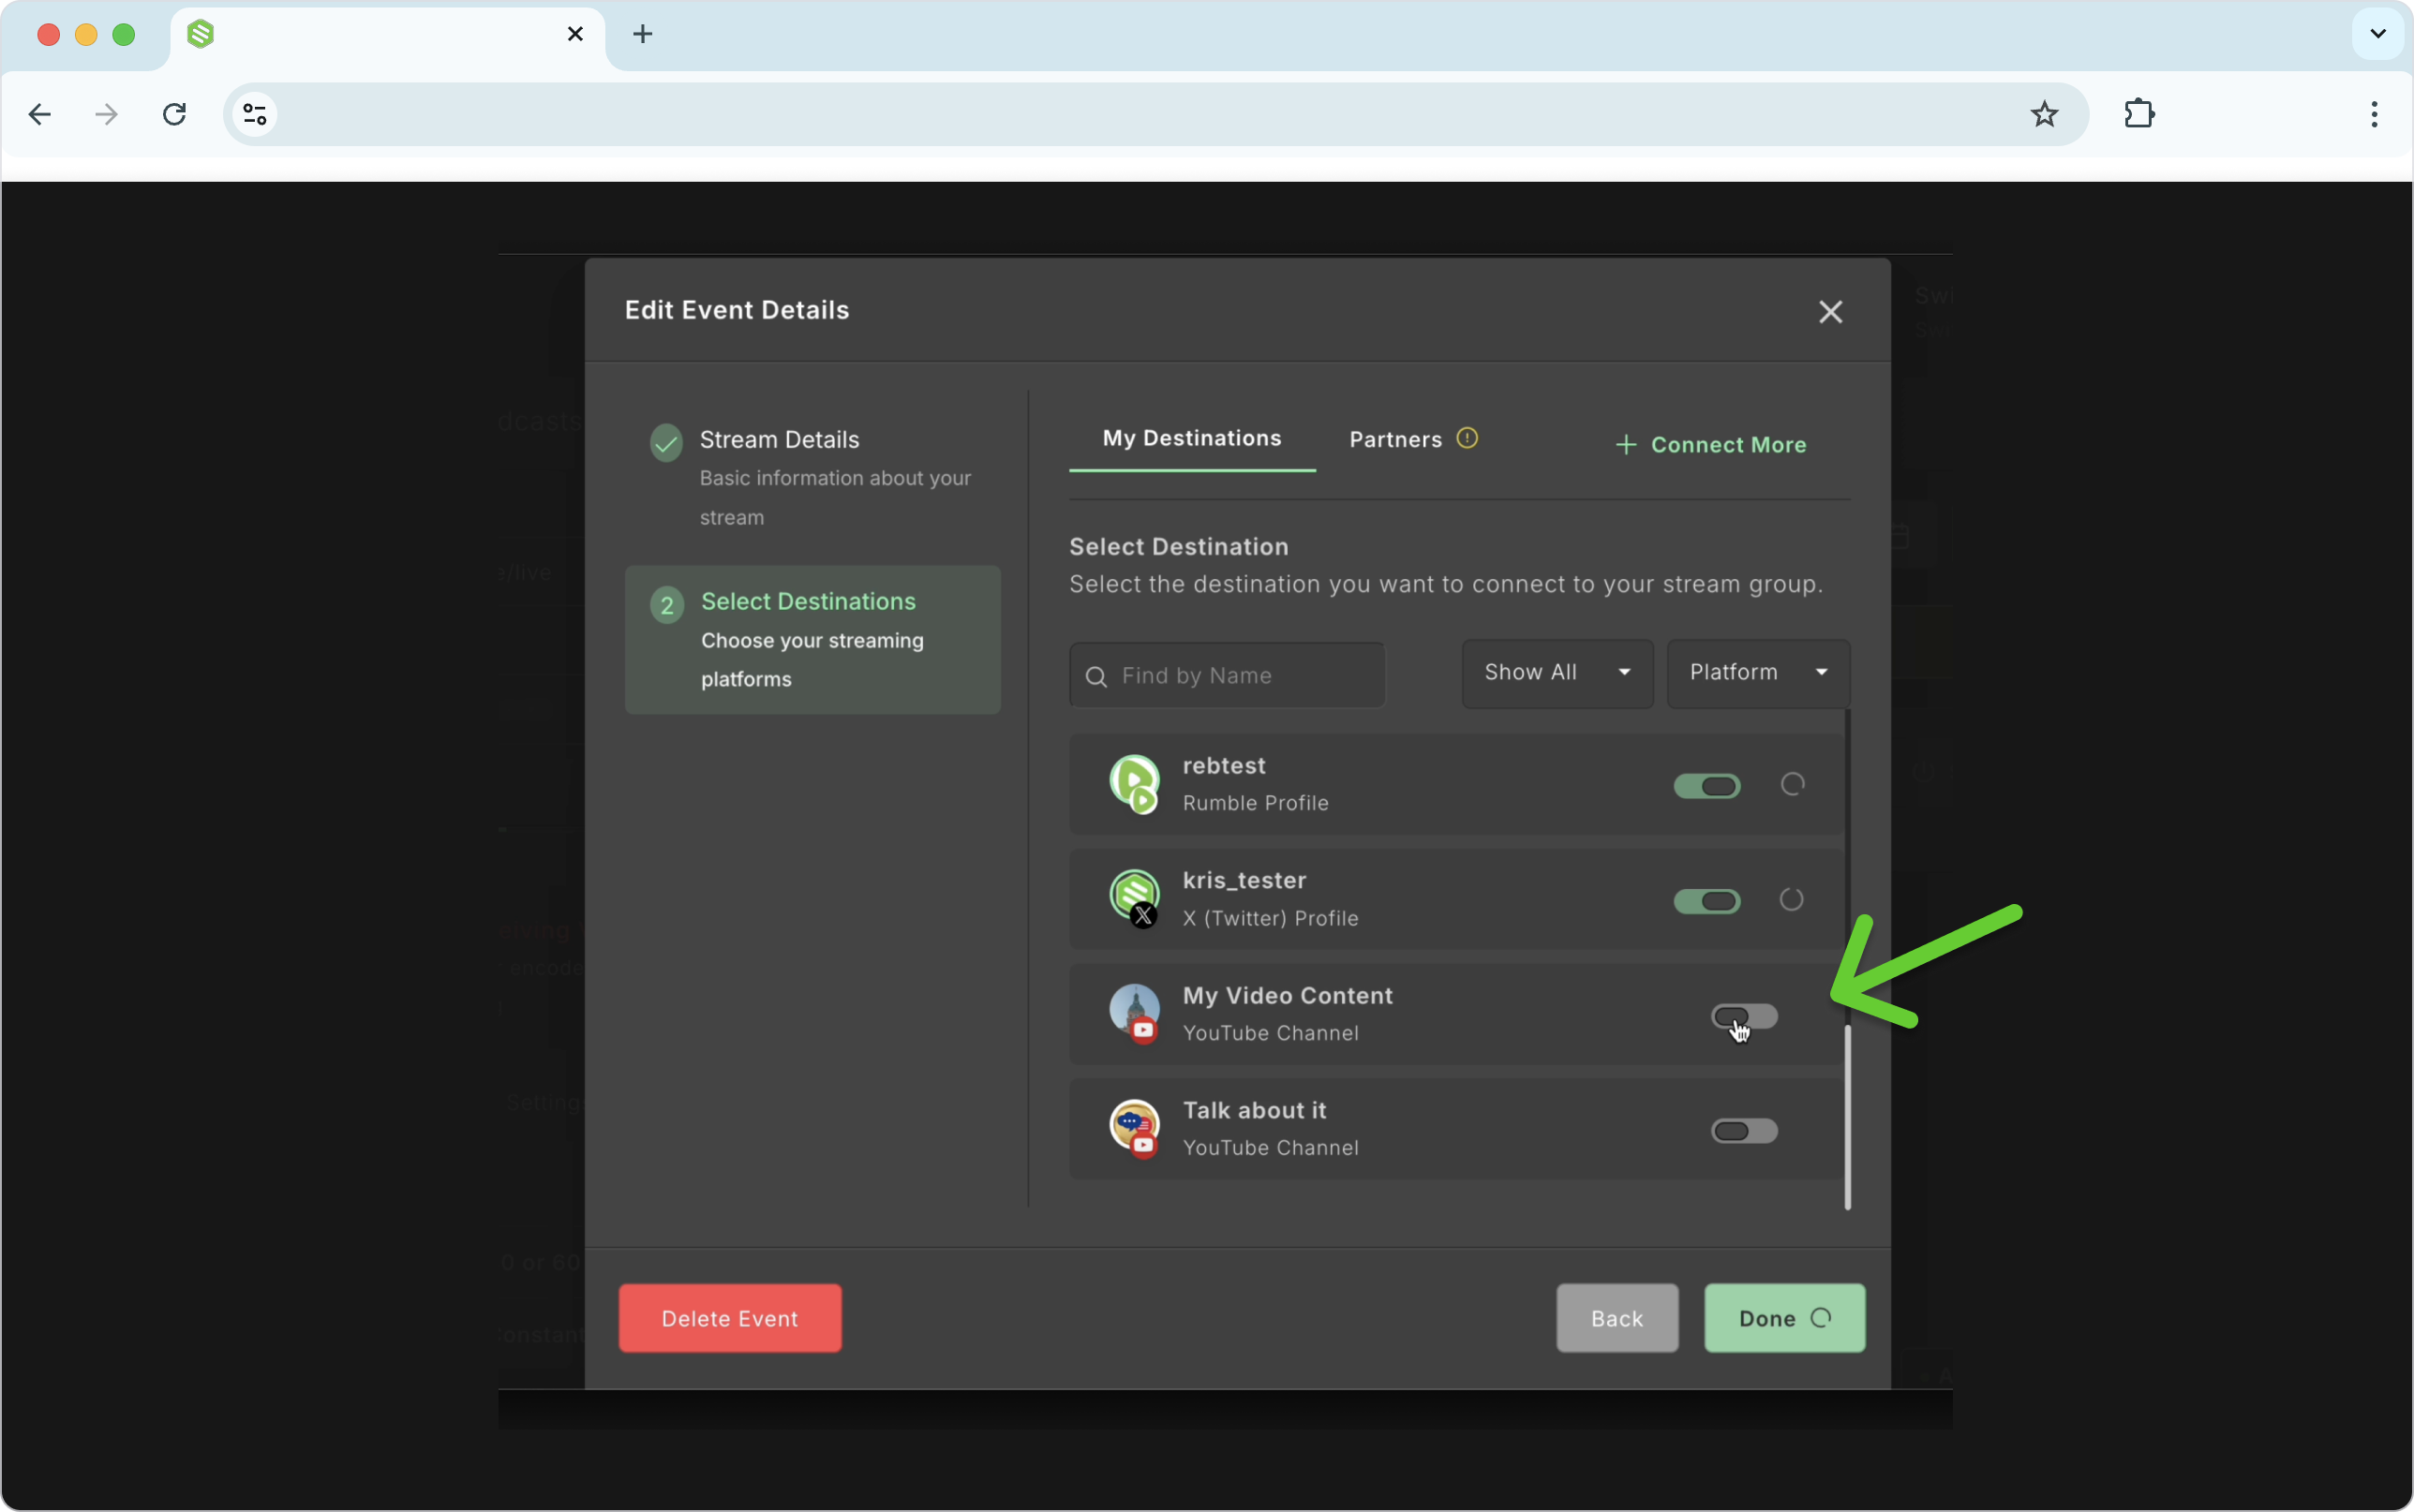
Click the toggle next to the Partner Destinations you want to include in the Event.
New Update: Announcements are now created for YouTube, Facebook Pages, LinkedIn, and X Partner Destinations
Click Done.
Going Live
Navigate to the appropriate workflow and click the Scheduled Events tab.
Start sending live video to the workflow.
Ensure the workflow is receiving video from the encoder.
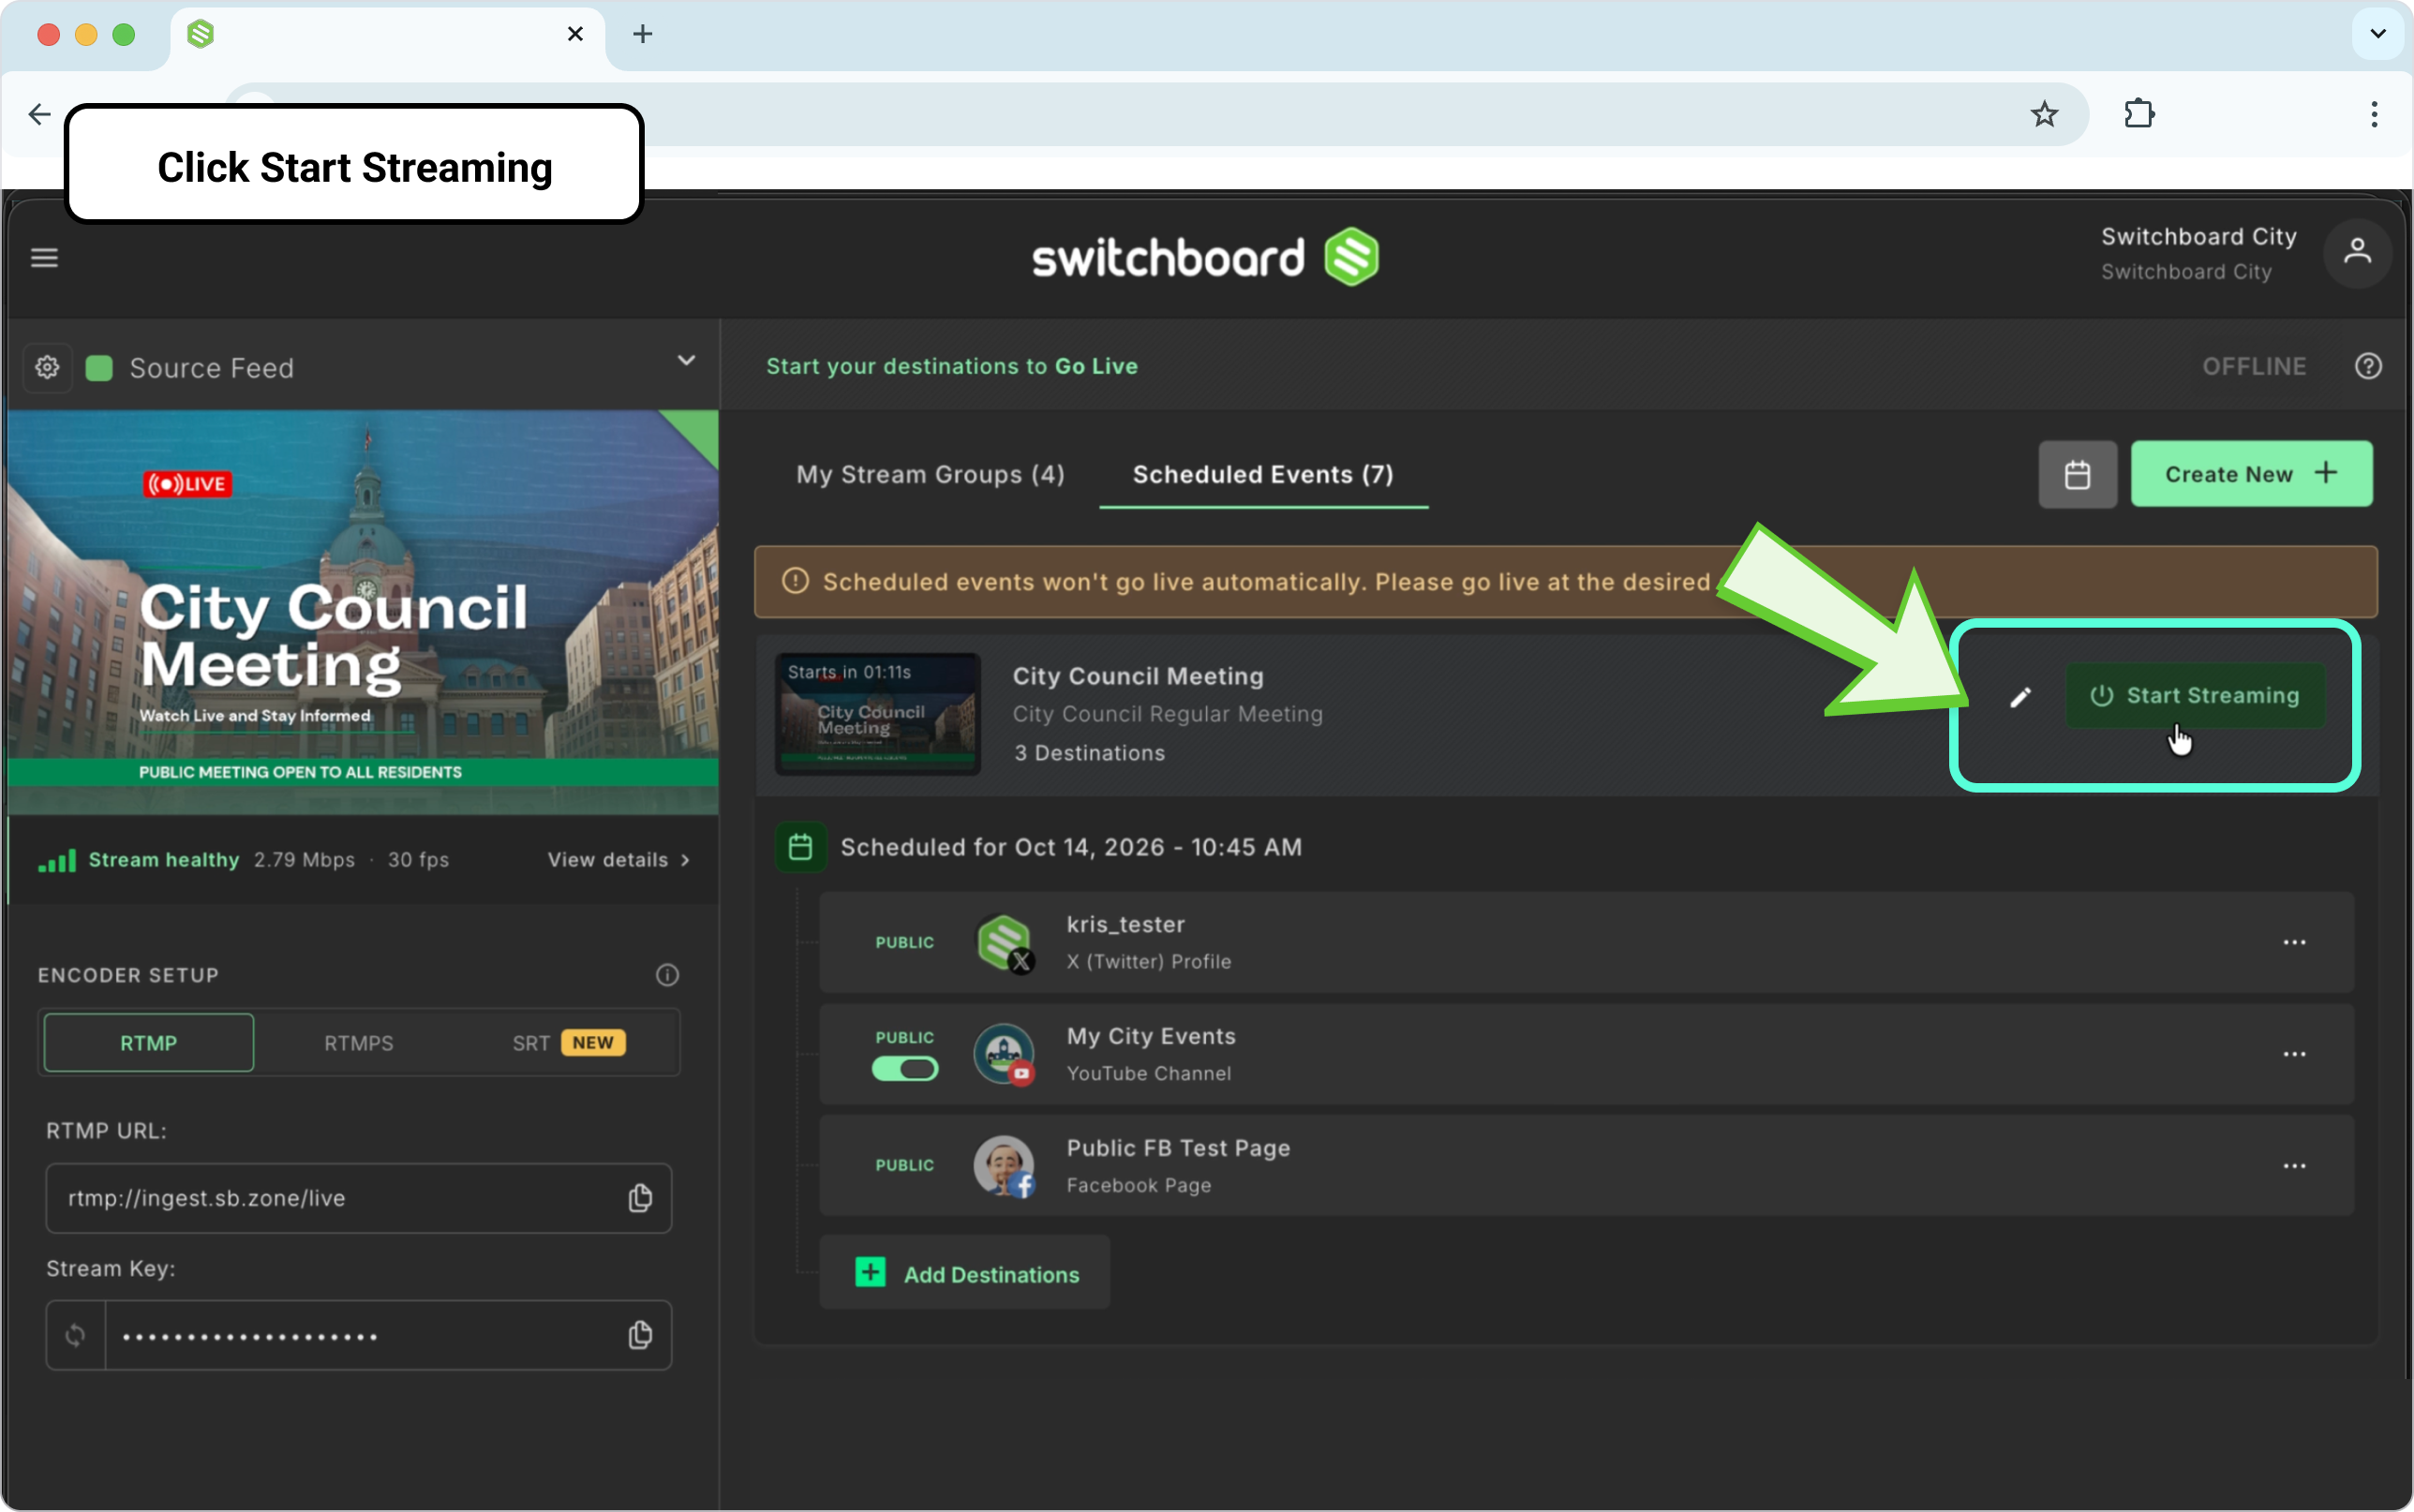
Note: You can Go Live 30 minutes before the scheduled time of the Event.
At the 30-minute mark, the Start Streaming button will turn green if the encoder is sending video.
Click Start Streaming to go live on all the destinations included in the Event Group. All destinations in the Stream Event Group will undergo the live process.
Note: Once you click the Start Streaming button, the destinations in the Scheduled Event group will go live!
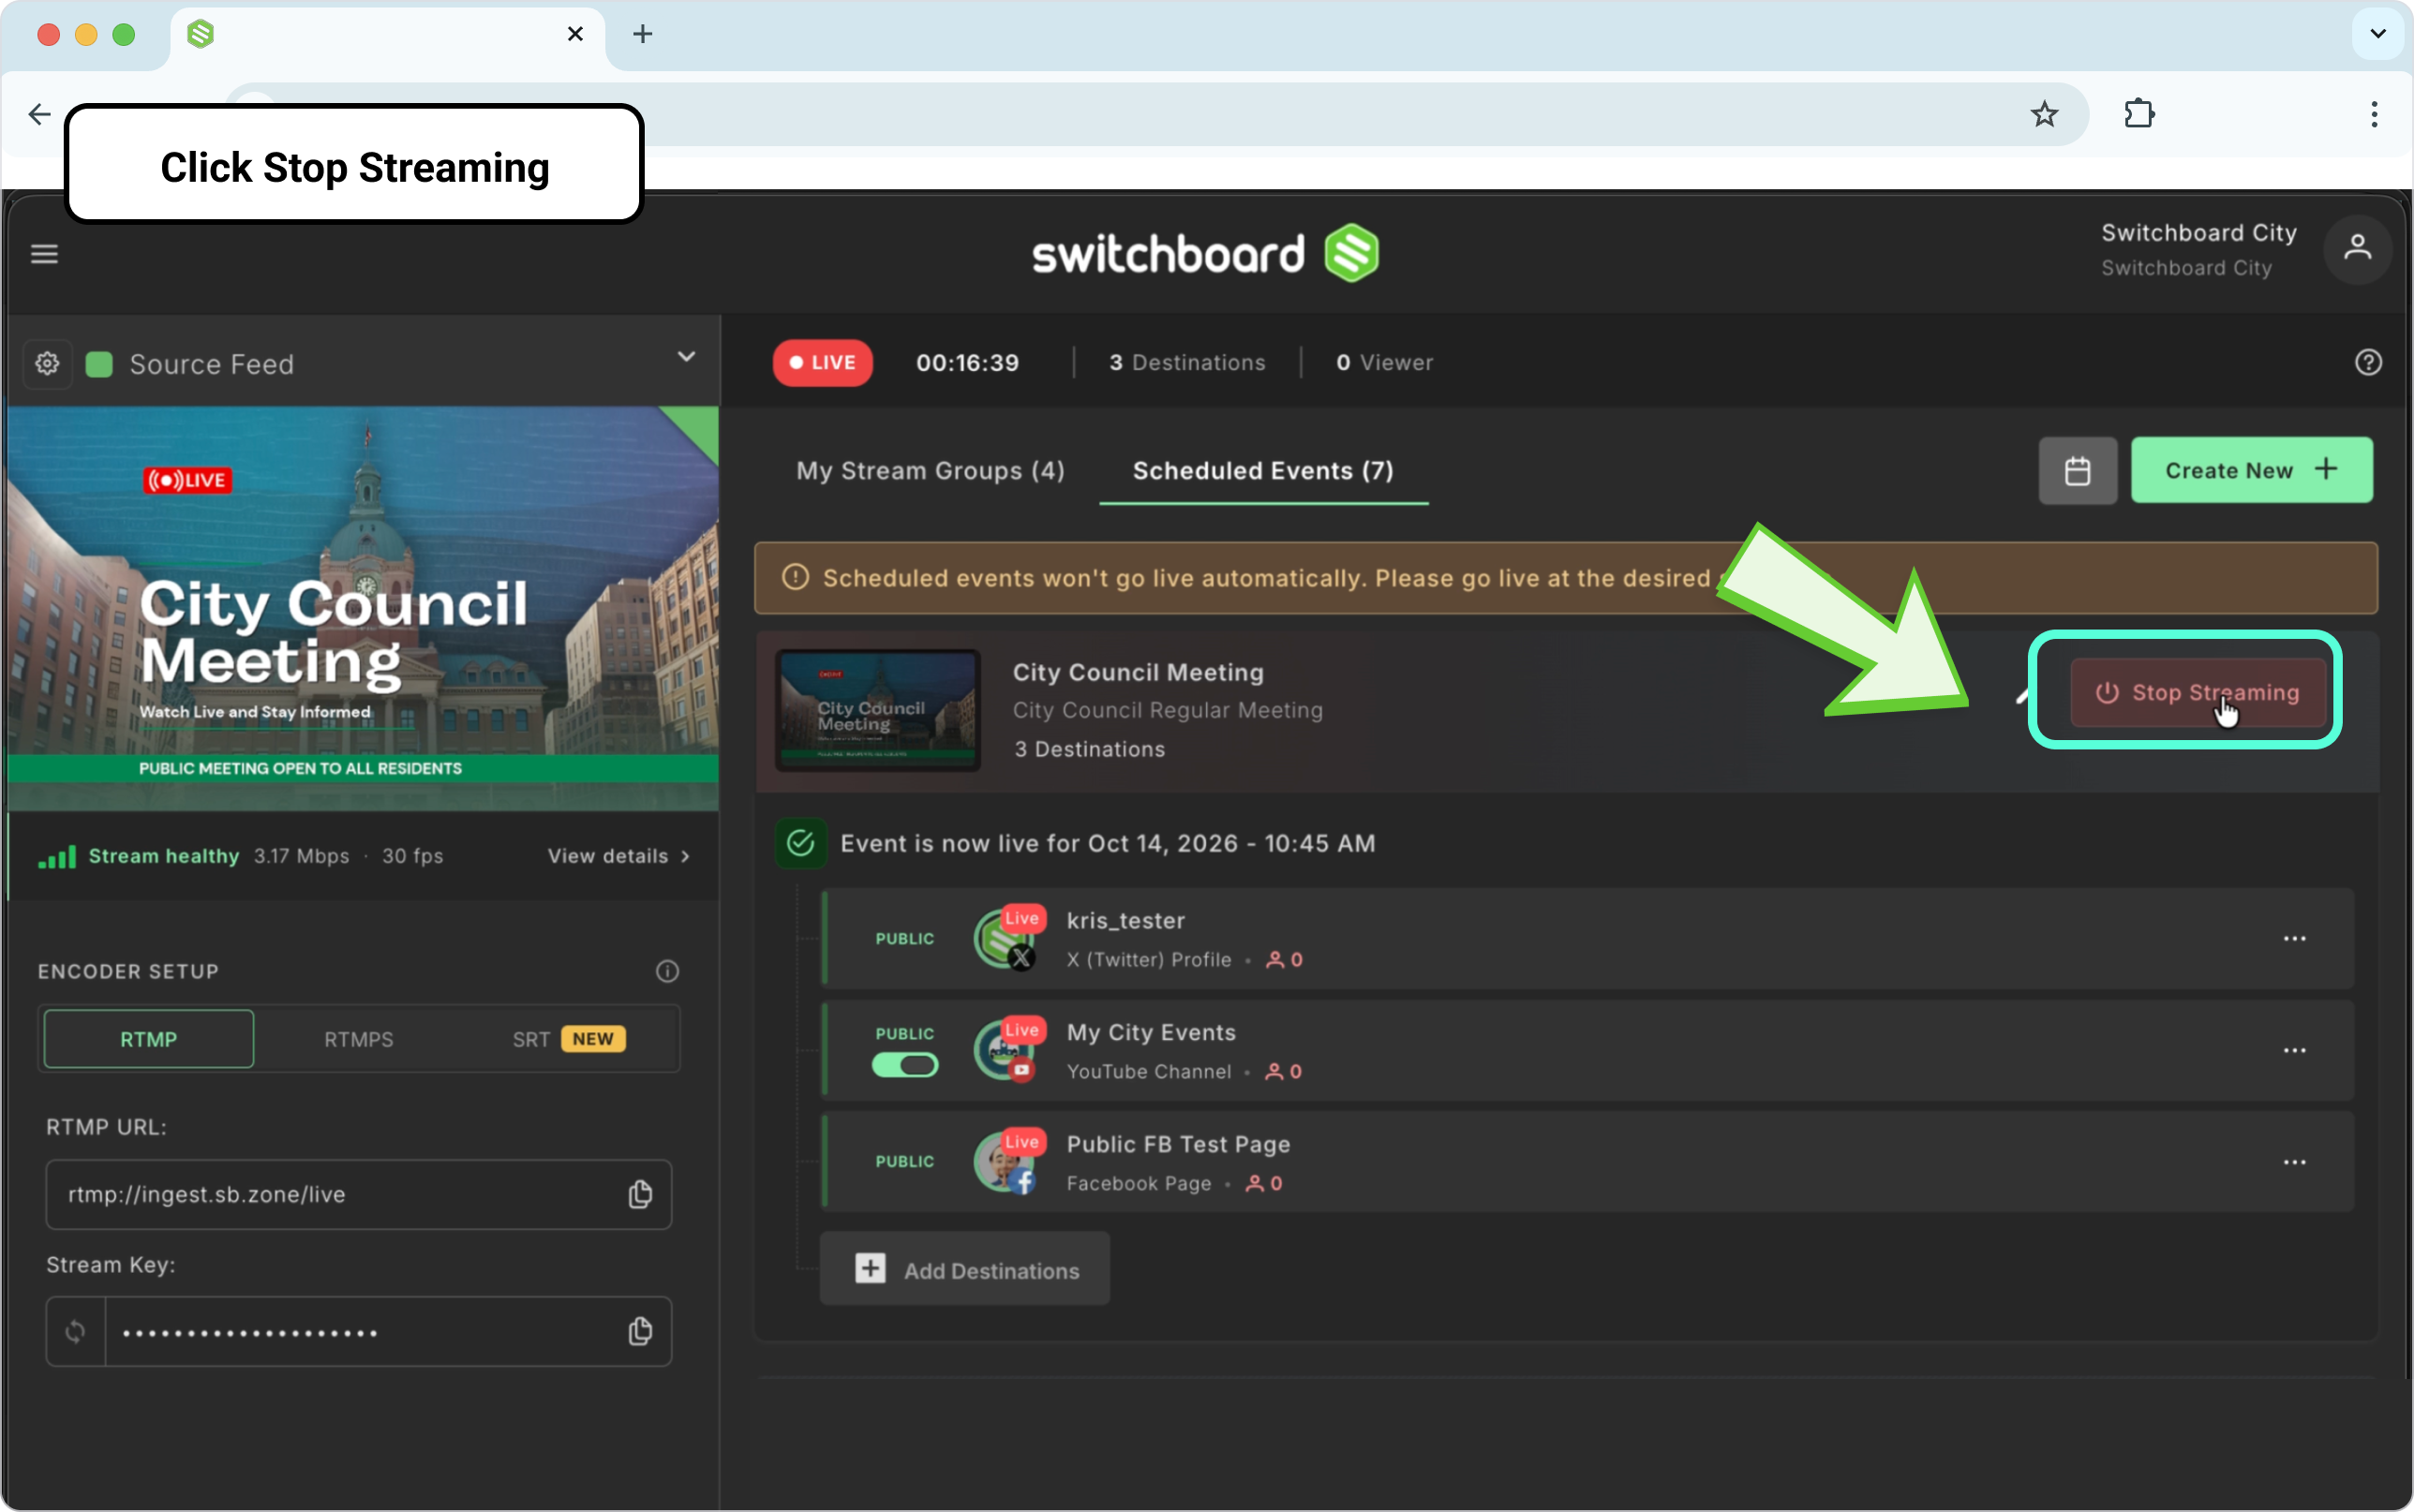
Live Destinations will have a “live” icon next to them.
Ending the Live Video
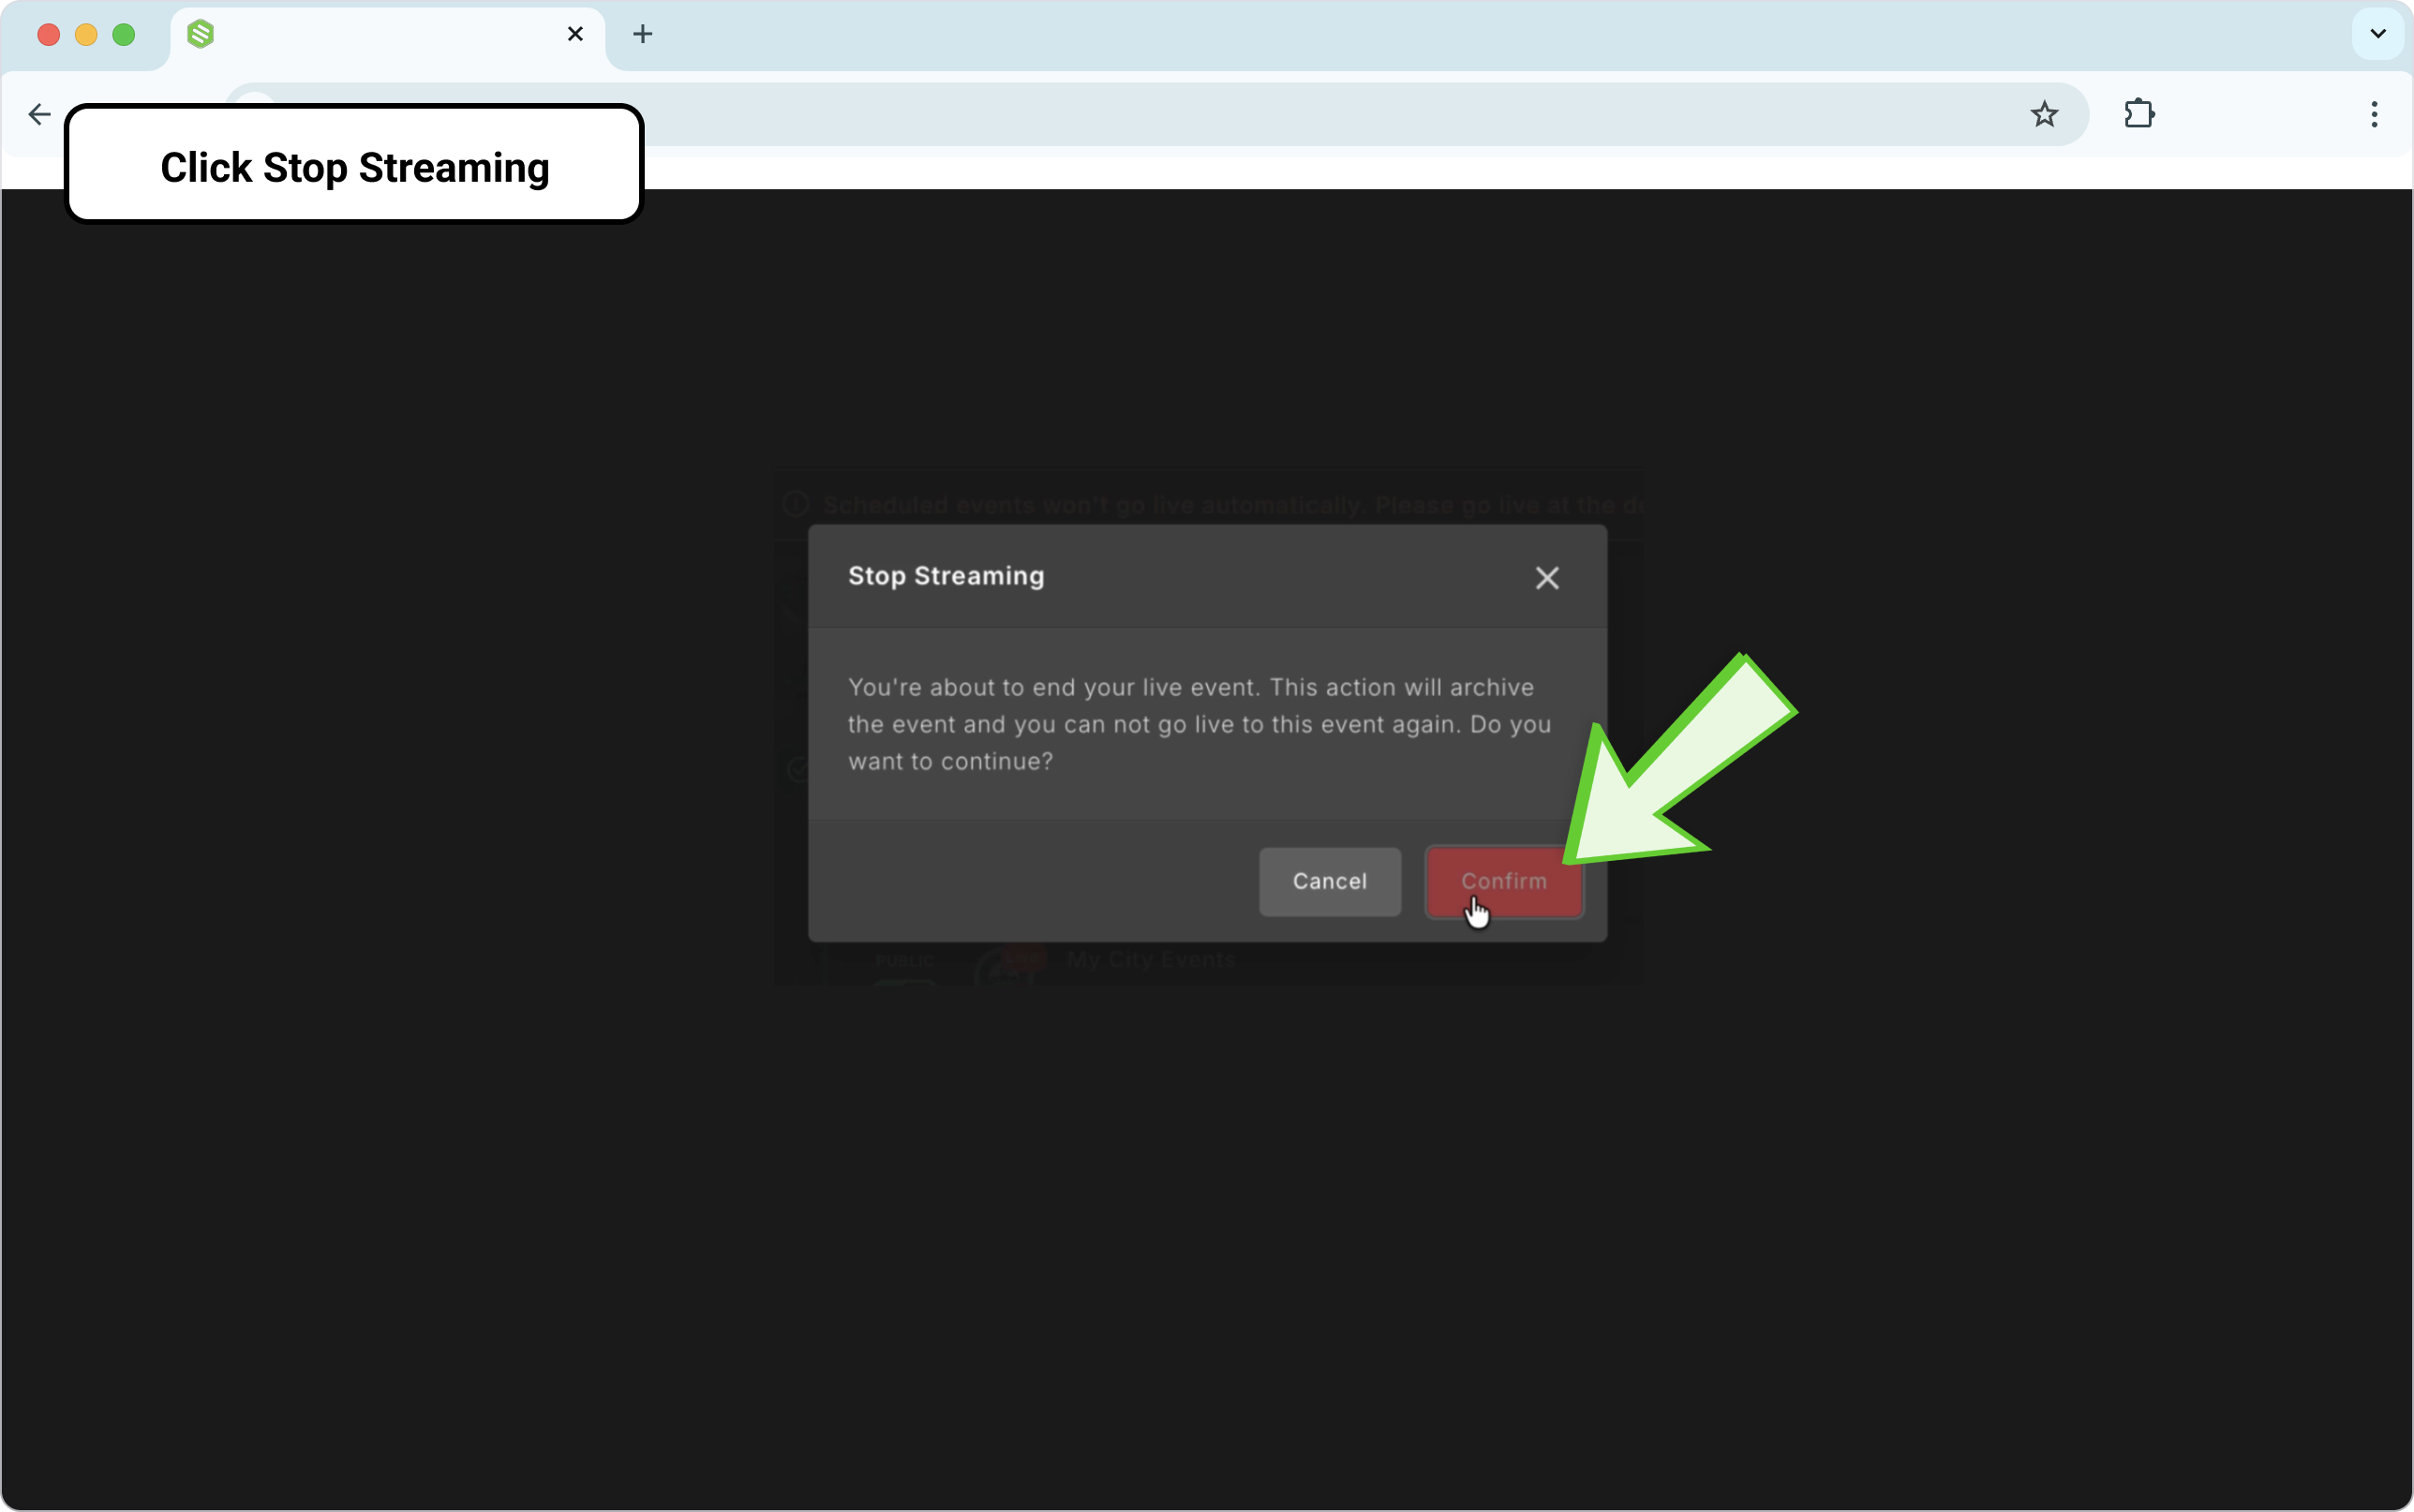
To end the live video, click Stop Streaming in the Event Header.
Confirm that you want to stop the event.
The destinations will stop streaming.
The Scheduled Event will be archived and removed from the workflow. You can access the post-event analytics by navigating to the Events Page Manager.
Promoting the Scheduled Event
Now that you’ve created the scheduled Event, you can grab the link and share it with your audience, add it to a newsletter, or post it on social media so people are notified of the upcoming live Event.
Navigate to the Scheduled Event.
There are two ways that you can find the event link: via the Switchboard Event Link or from your YouTube channel share button.
Inside Switchboard:
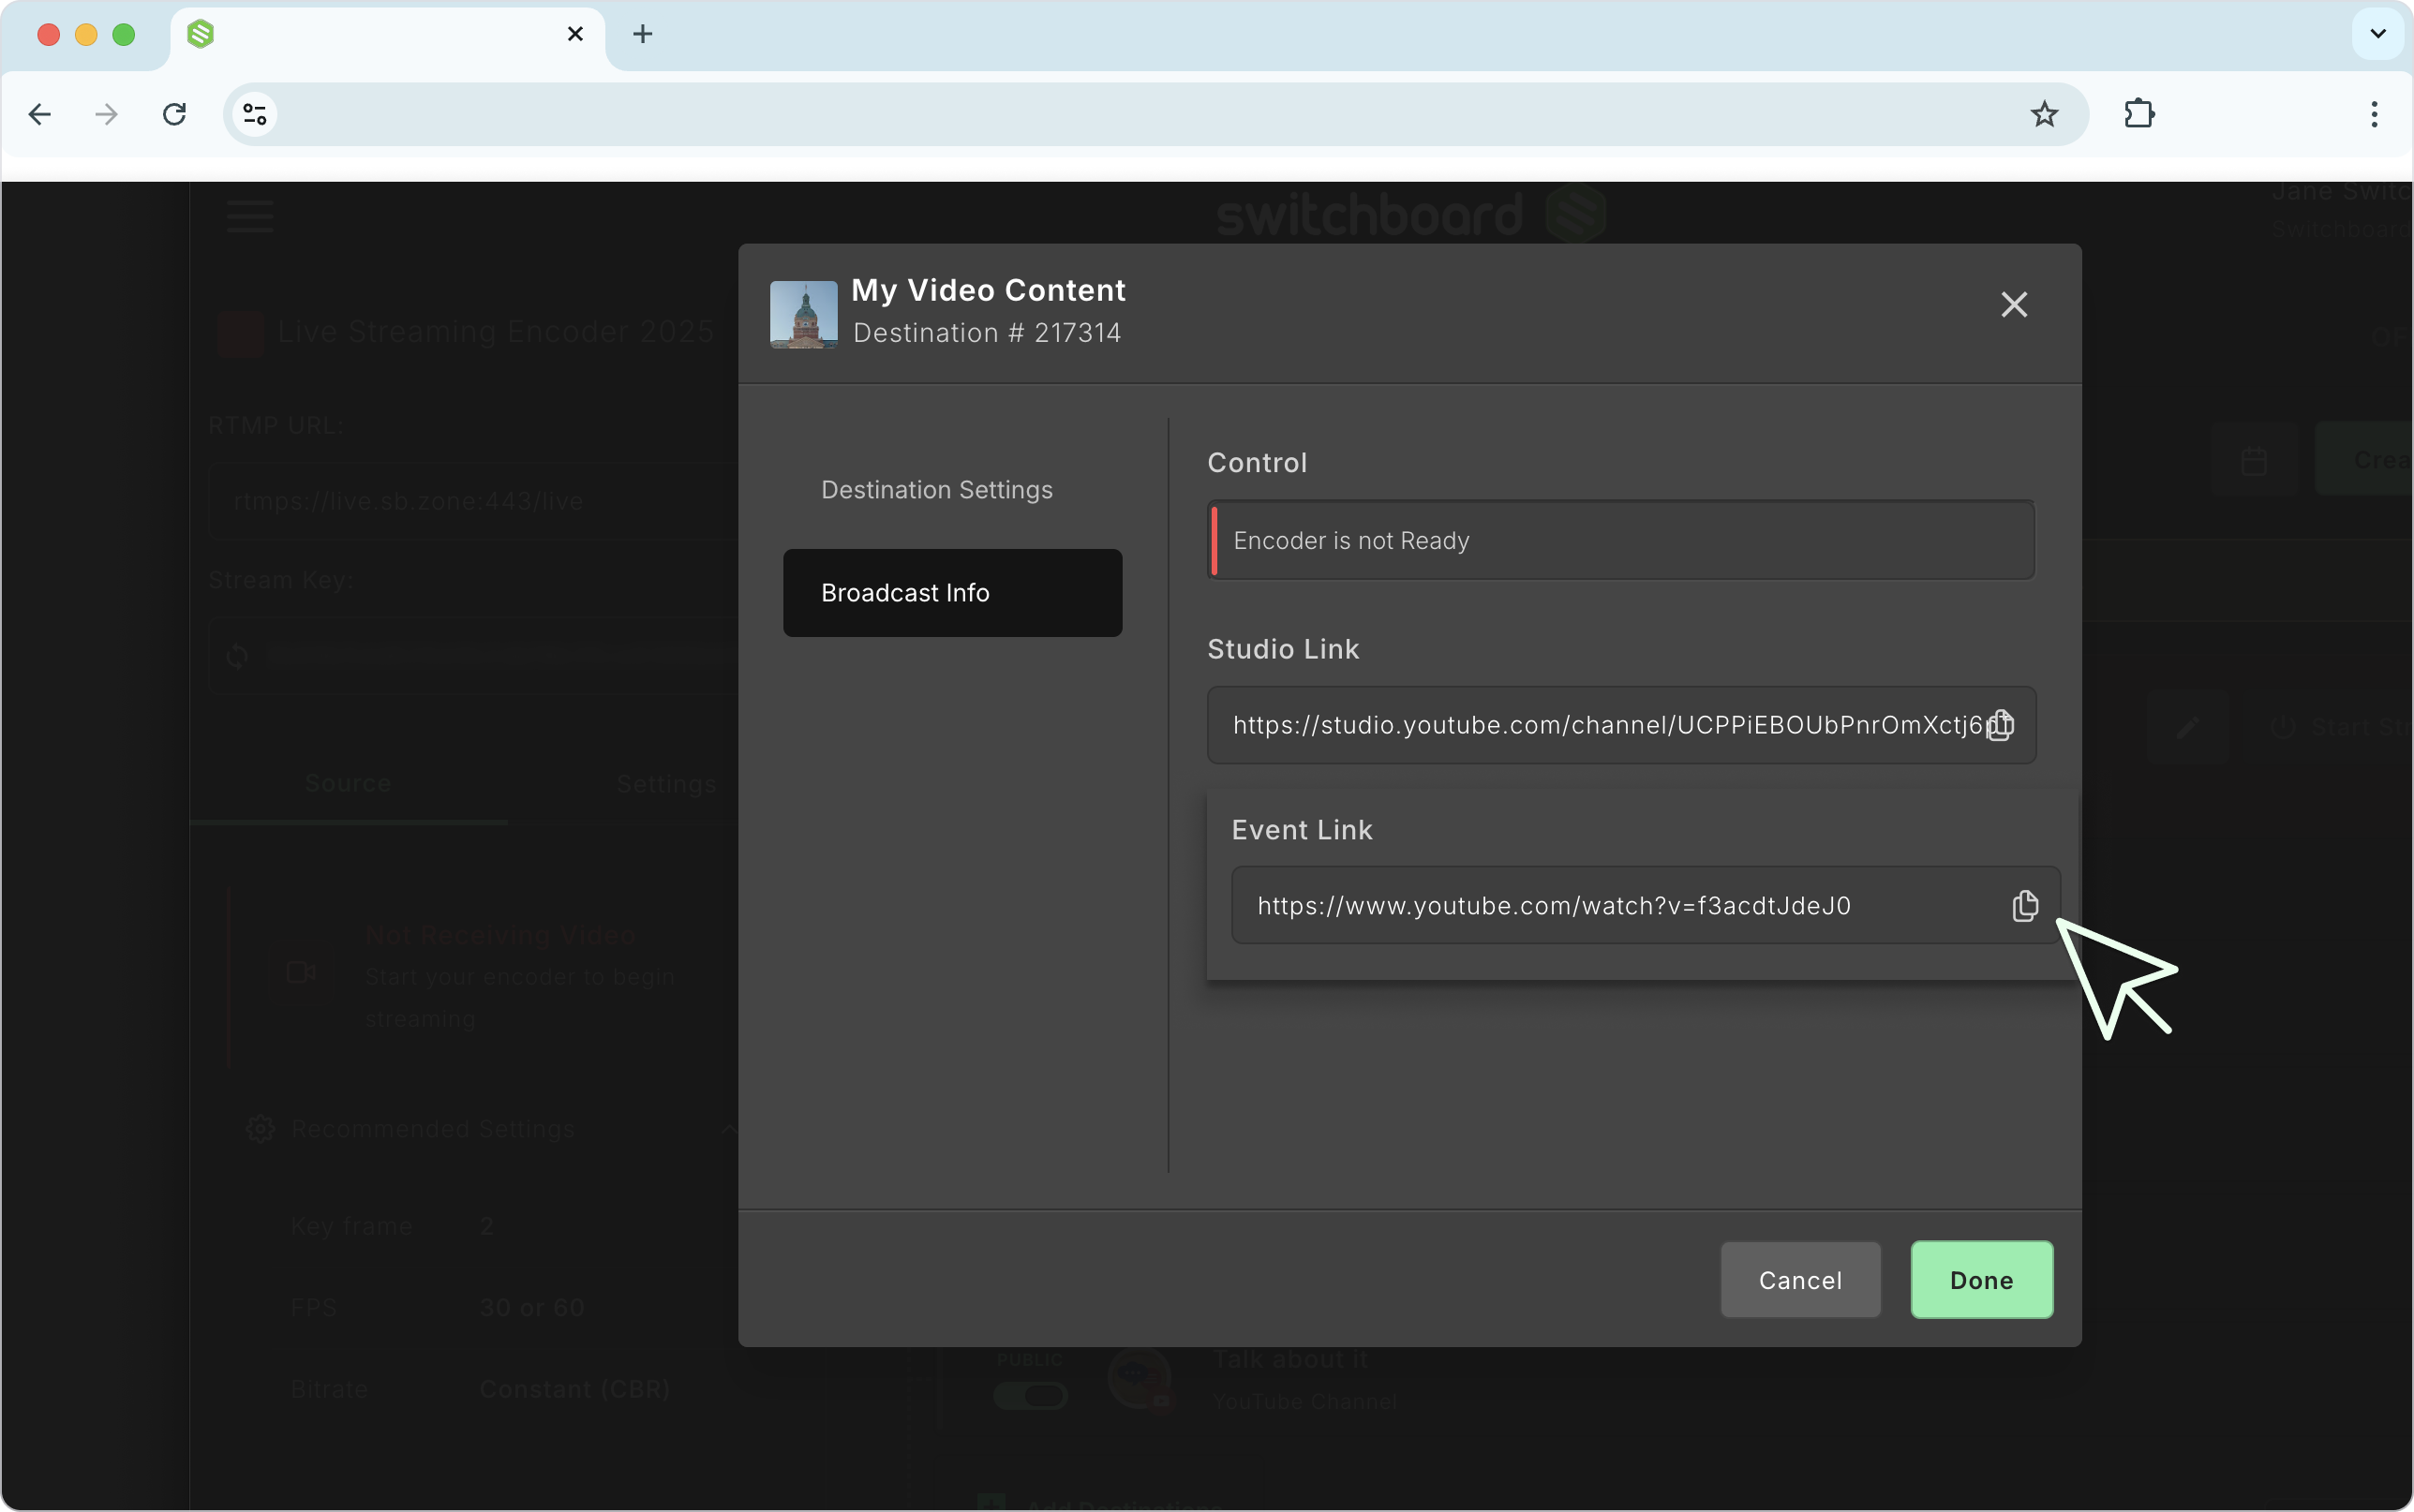
In the workflow, click the three dots next to Destination.
A new window will pop up; choose Broadcast info from the menu.
Under the Event Link, click to copy the shareable link.
Copy the link and share it with your networks.
Direct Click on the Destination Icon
While on the workflow, click the Destination icon within the event group, or click the three dots and choose View stream from the pop-out menu.
This opens the scheduled event page on the Destination. You can find the Share with audience button there.
How Do I Edit My Scheduled Event?
Making changes is easy; you can edit all your events at once in the Event Page Manager or navigate to an event on the workflow page.
Editing via the Global Events Page Manager
Open the Events Page Manager. ( Main Menu > Events)
Select the Upcoming Events tab
Click Edit Event next to the Event you want to update.
Make changes to the Event, such as the schedule time, stream title, and destinations.
You can also delete the Scheduled Event at this step.
Editing via a Specific Workflow
Navigate to the desired Workflow.
Select the Scheduled Events tab
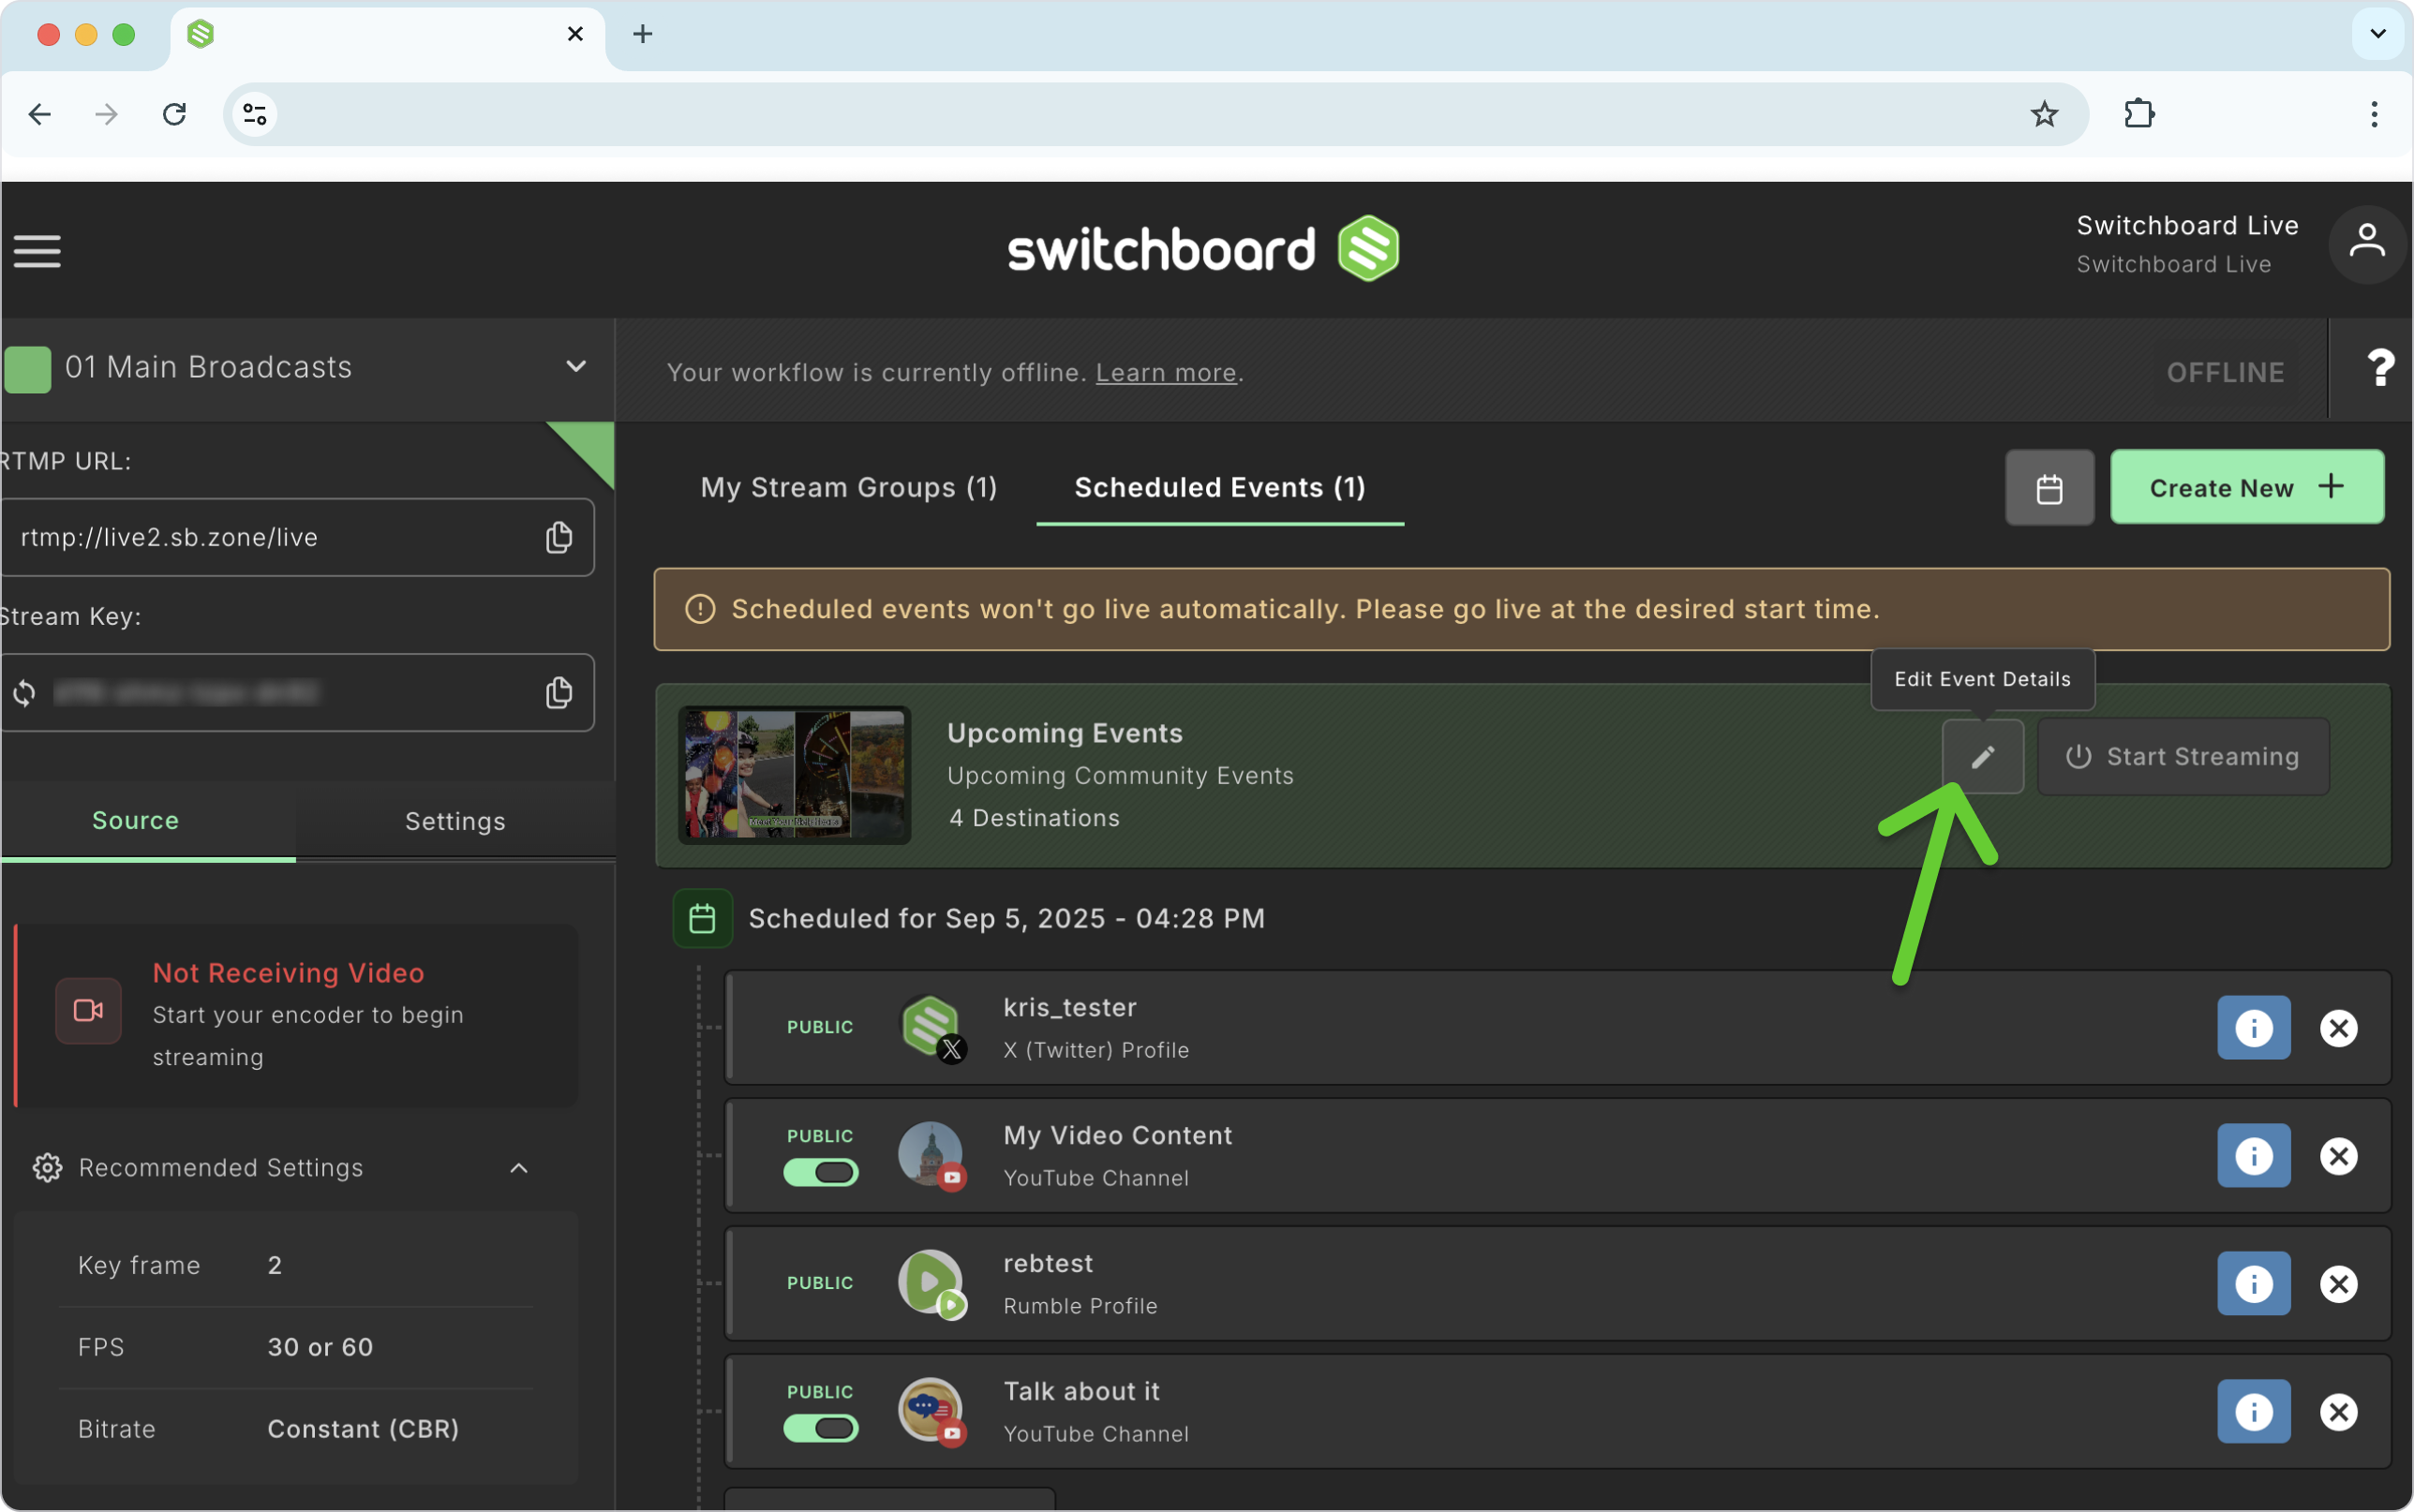
Click the pencil icon in the header of an upcoming event.
Make changes to the Event, such as the schedule time, stream title, and destinations.
You can also delete the Scheduled Event at this step. If you don’t see the scheduled event on the Workflow page, click the calendar icon in the header and select the date. All scheduled events on that date will appear.
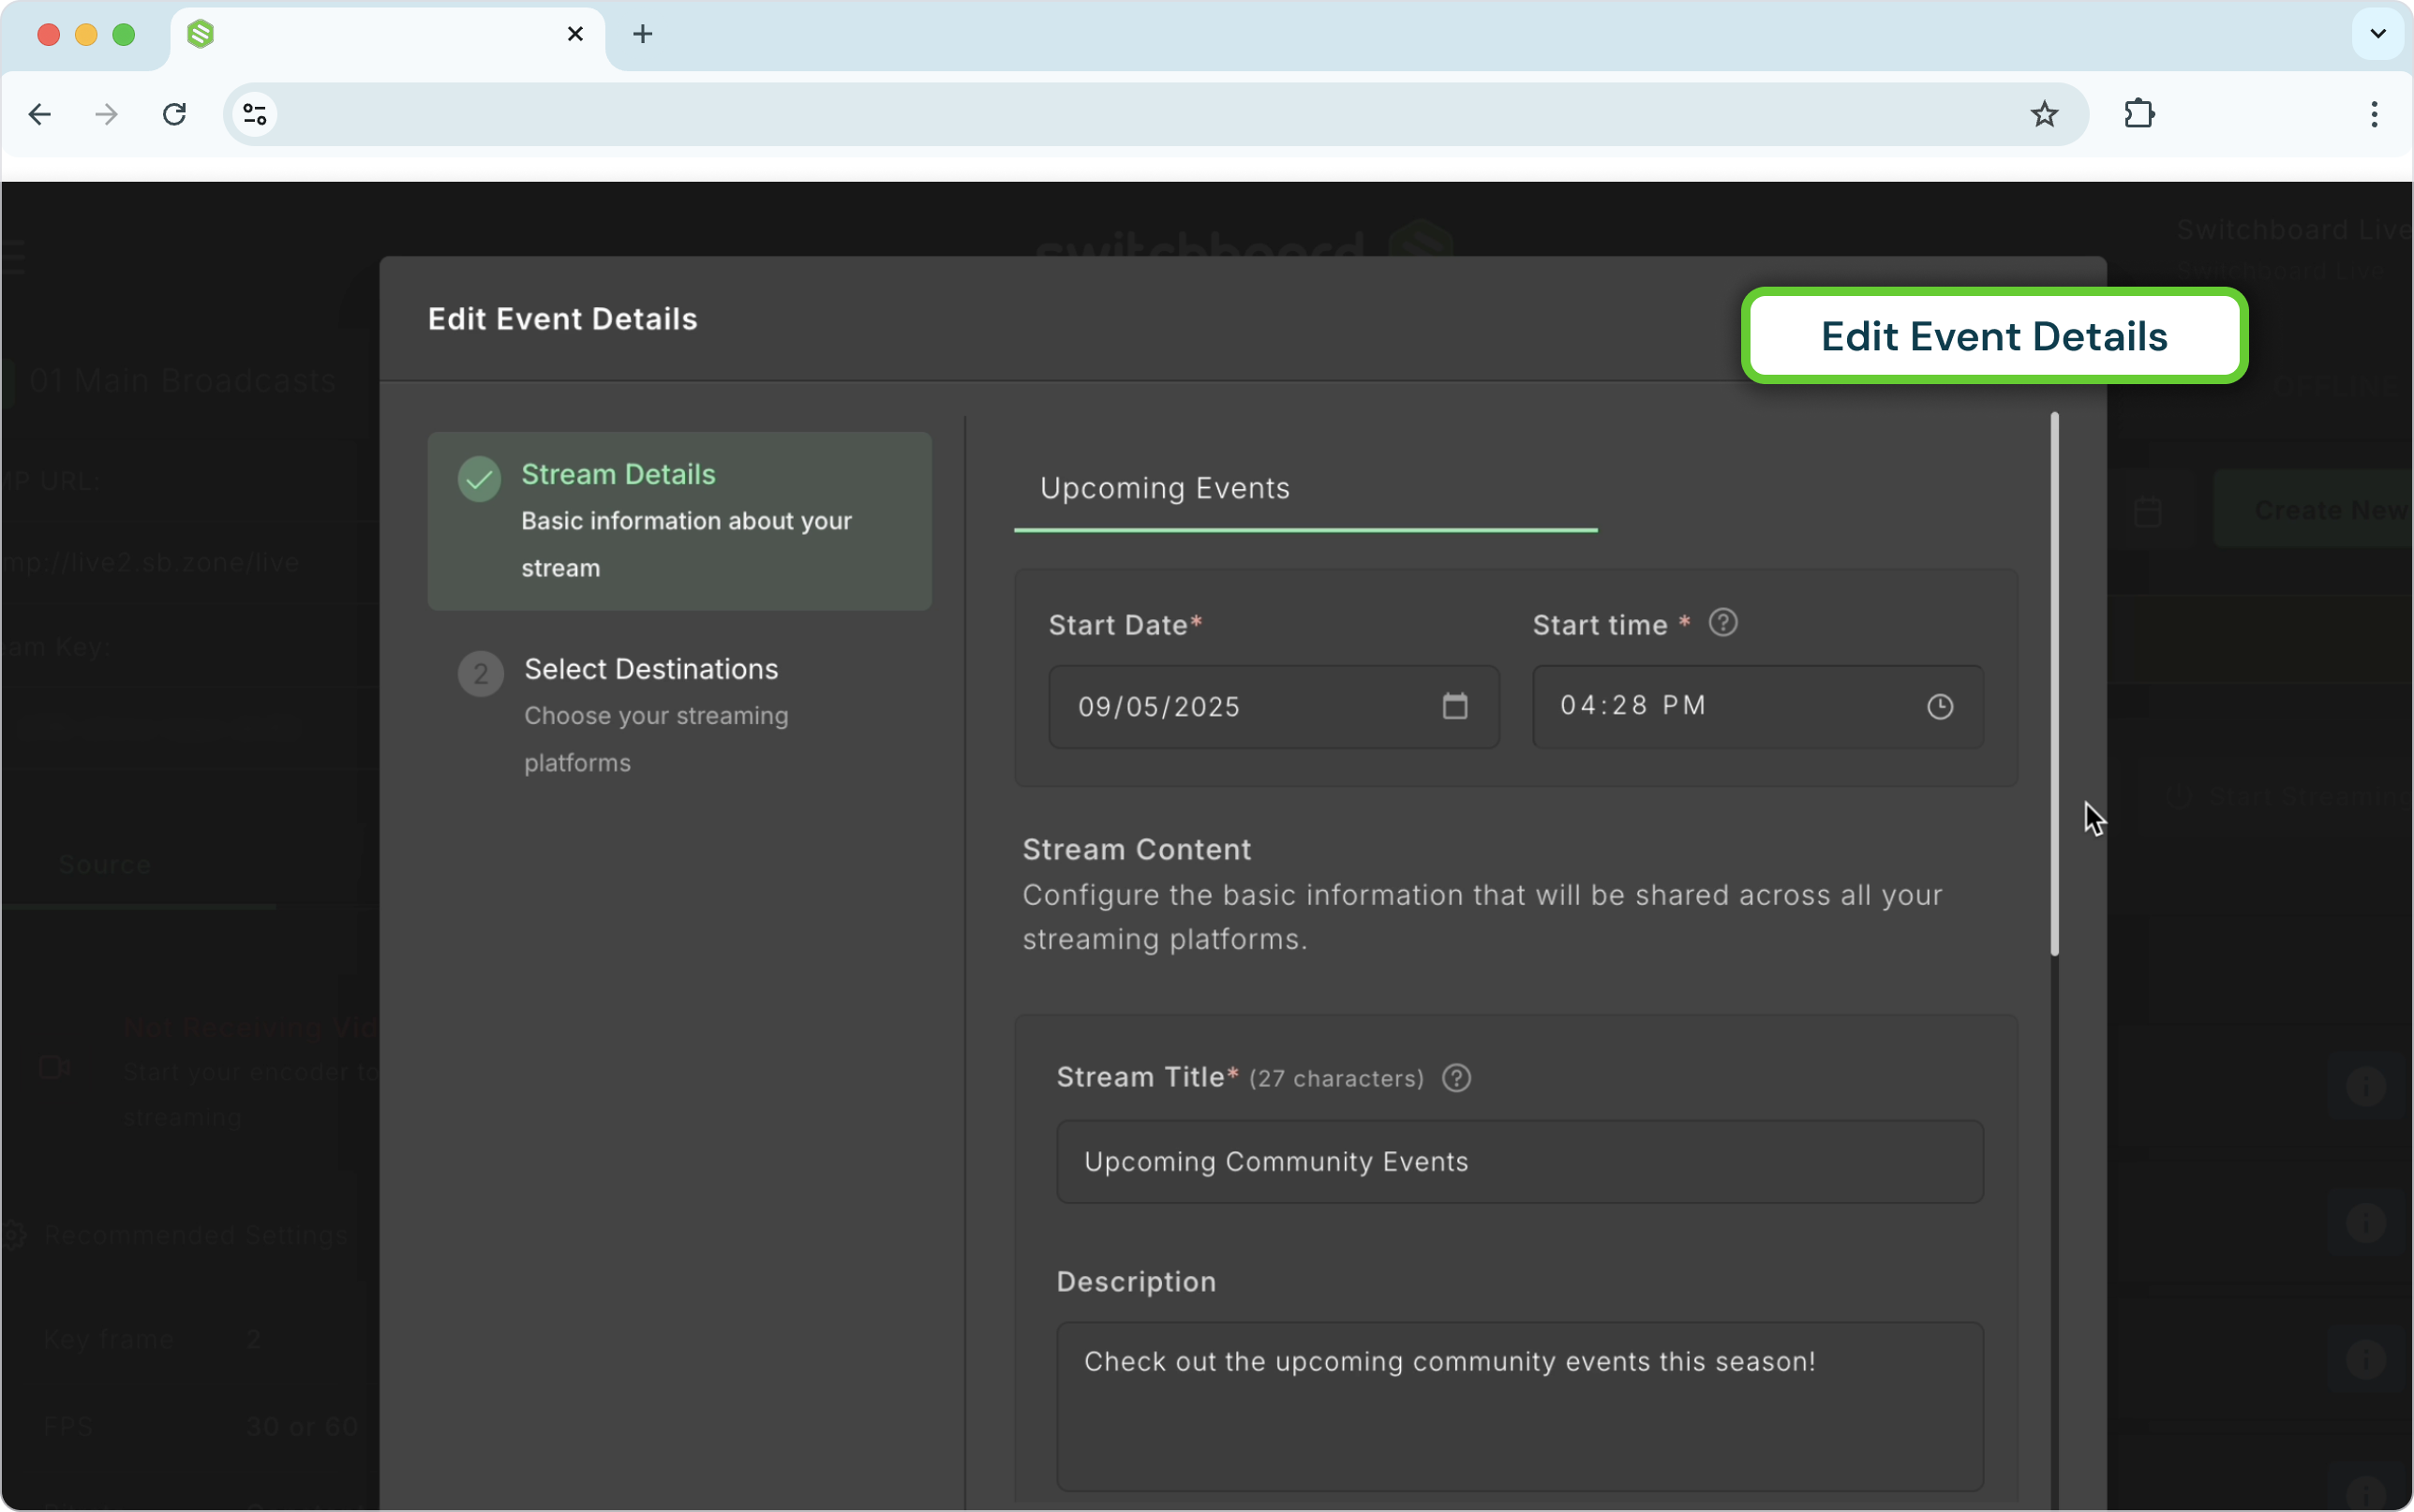
Note: You can't edit the stream title, description, or thumbnail for a LinkedIn Page; LinkedIn restricts this.

How to Remove Destinations from a Scheduled Event
To remove a destination from a scheduled event, you can do so at any time before you go live. There are a few ways to do this.
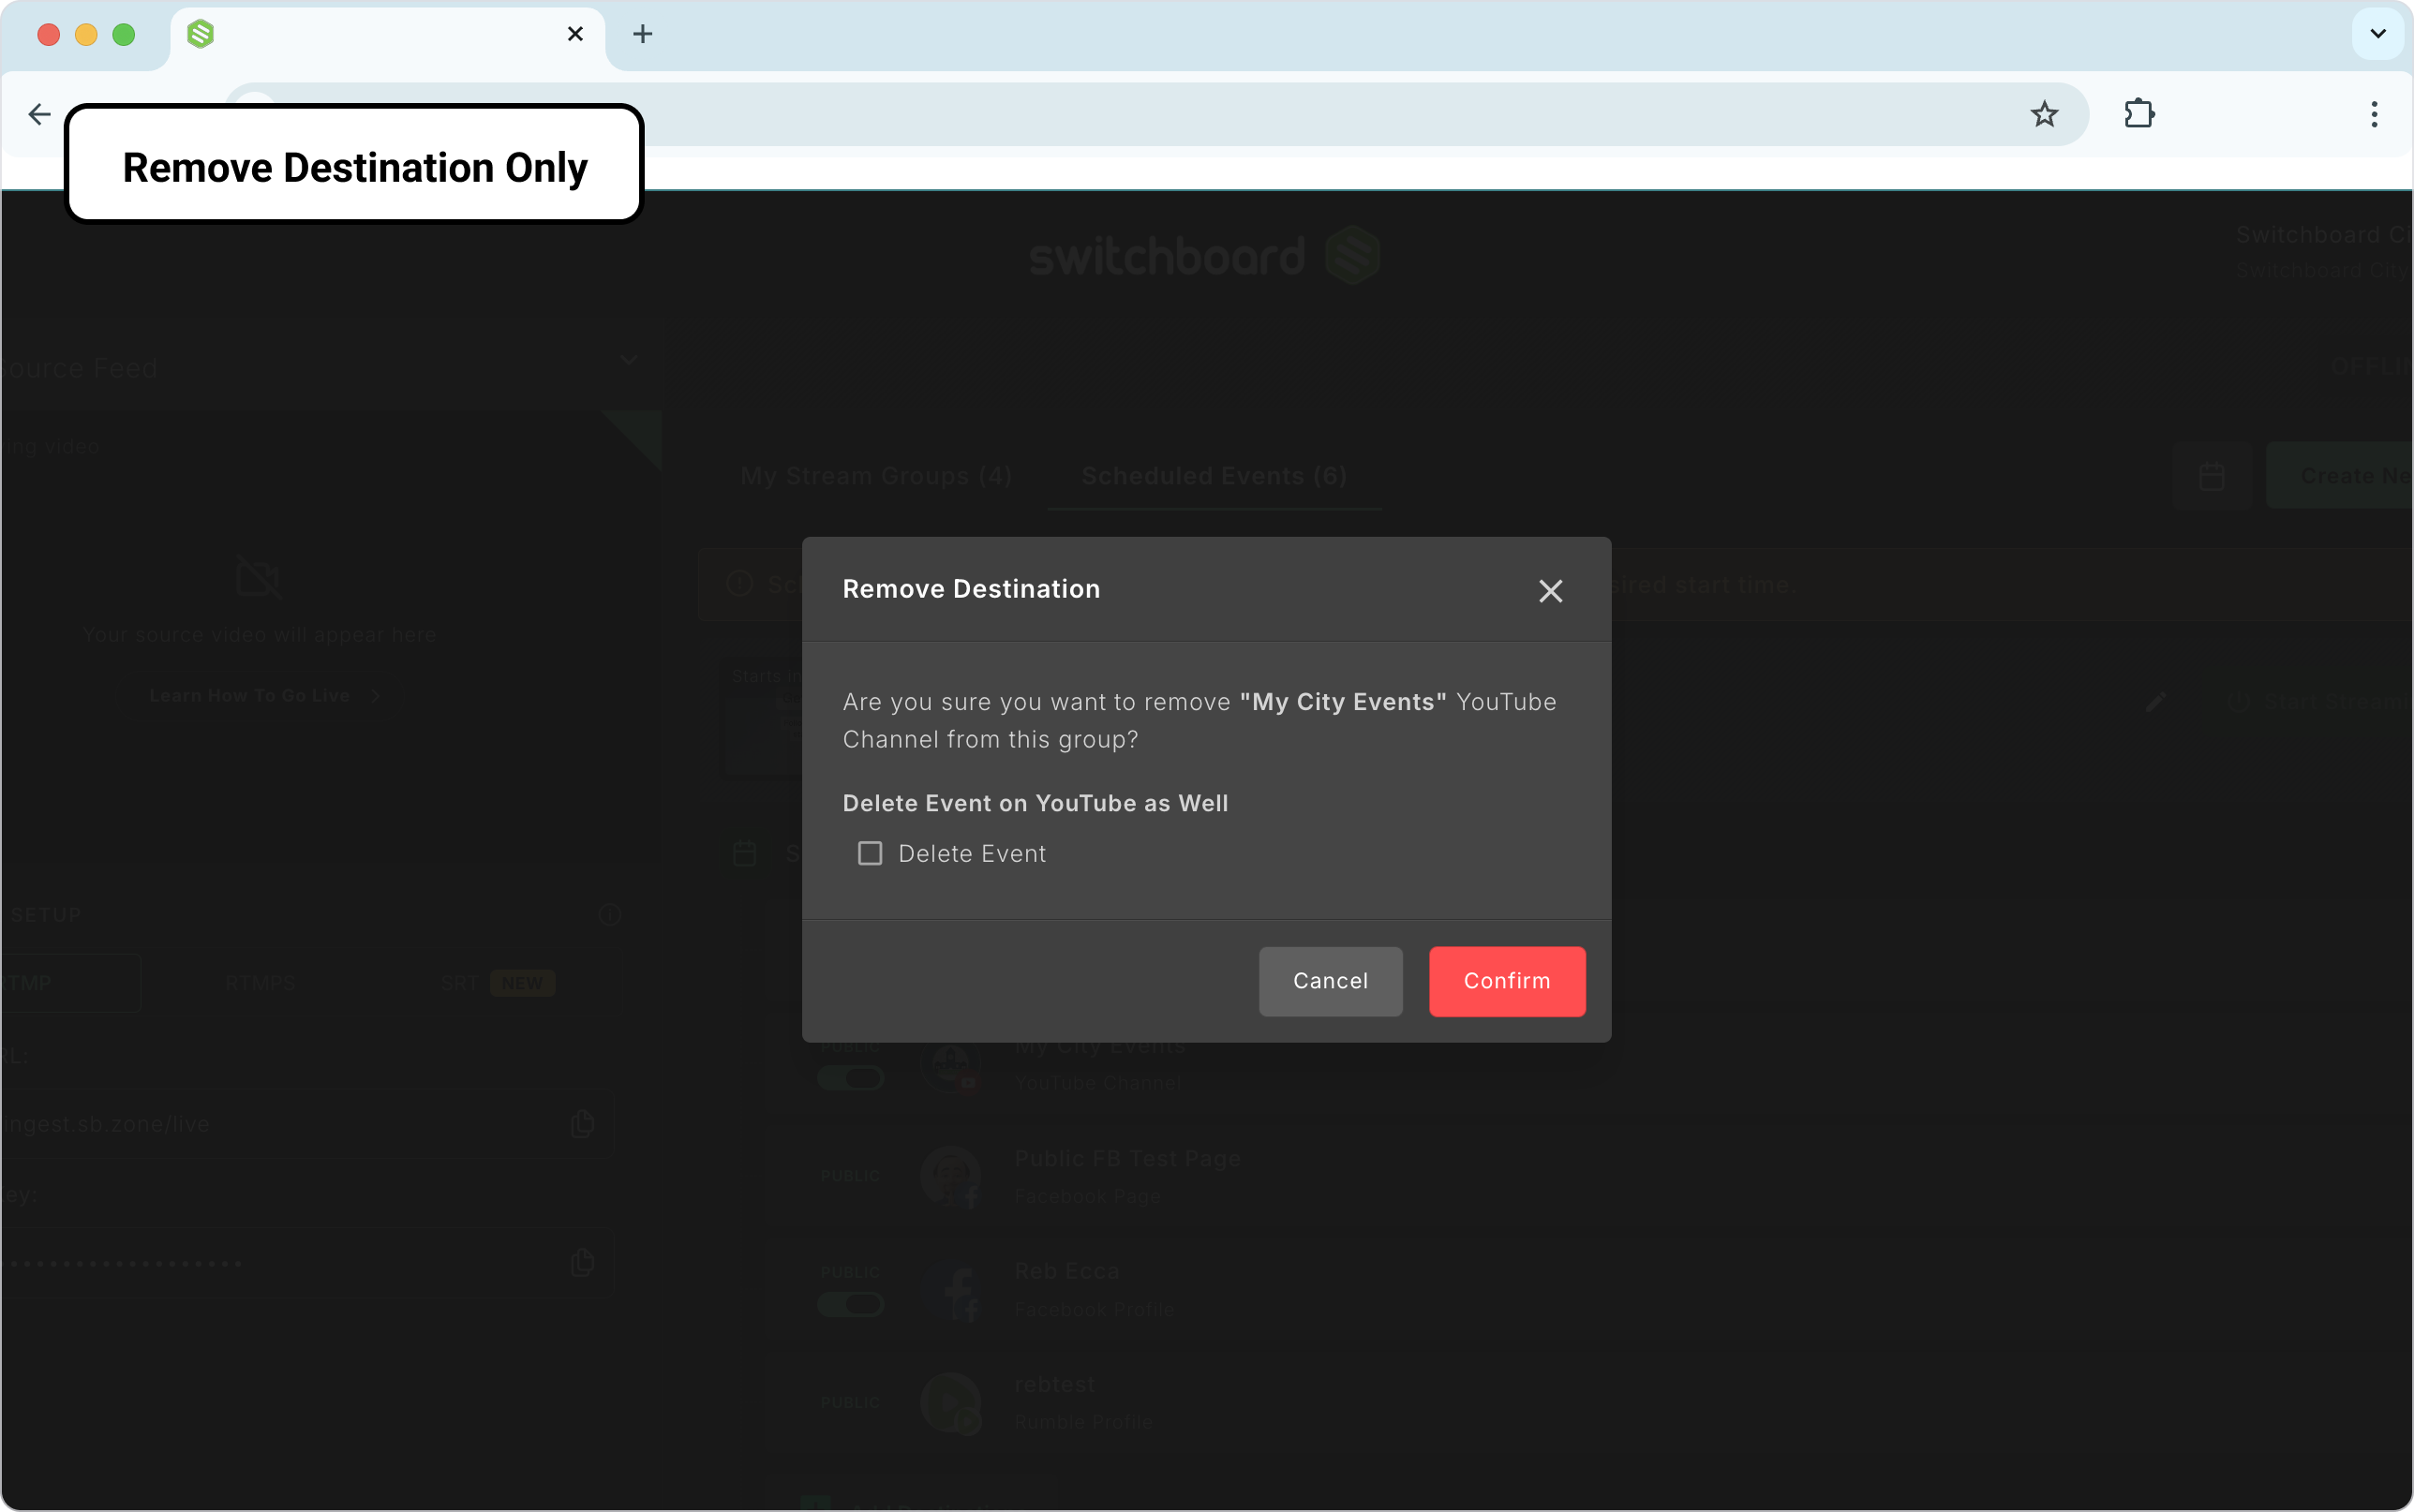
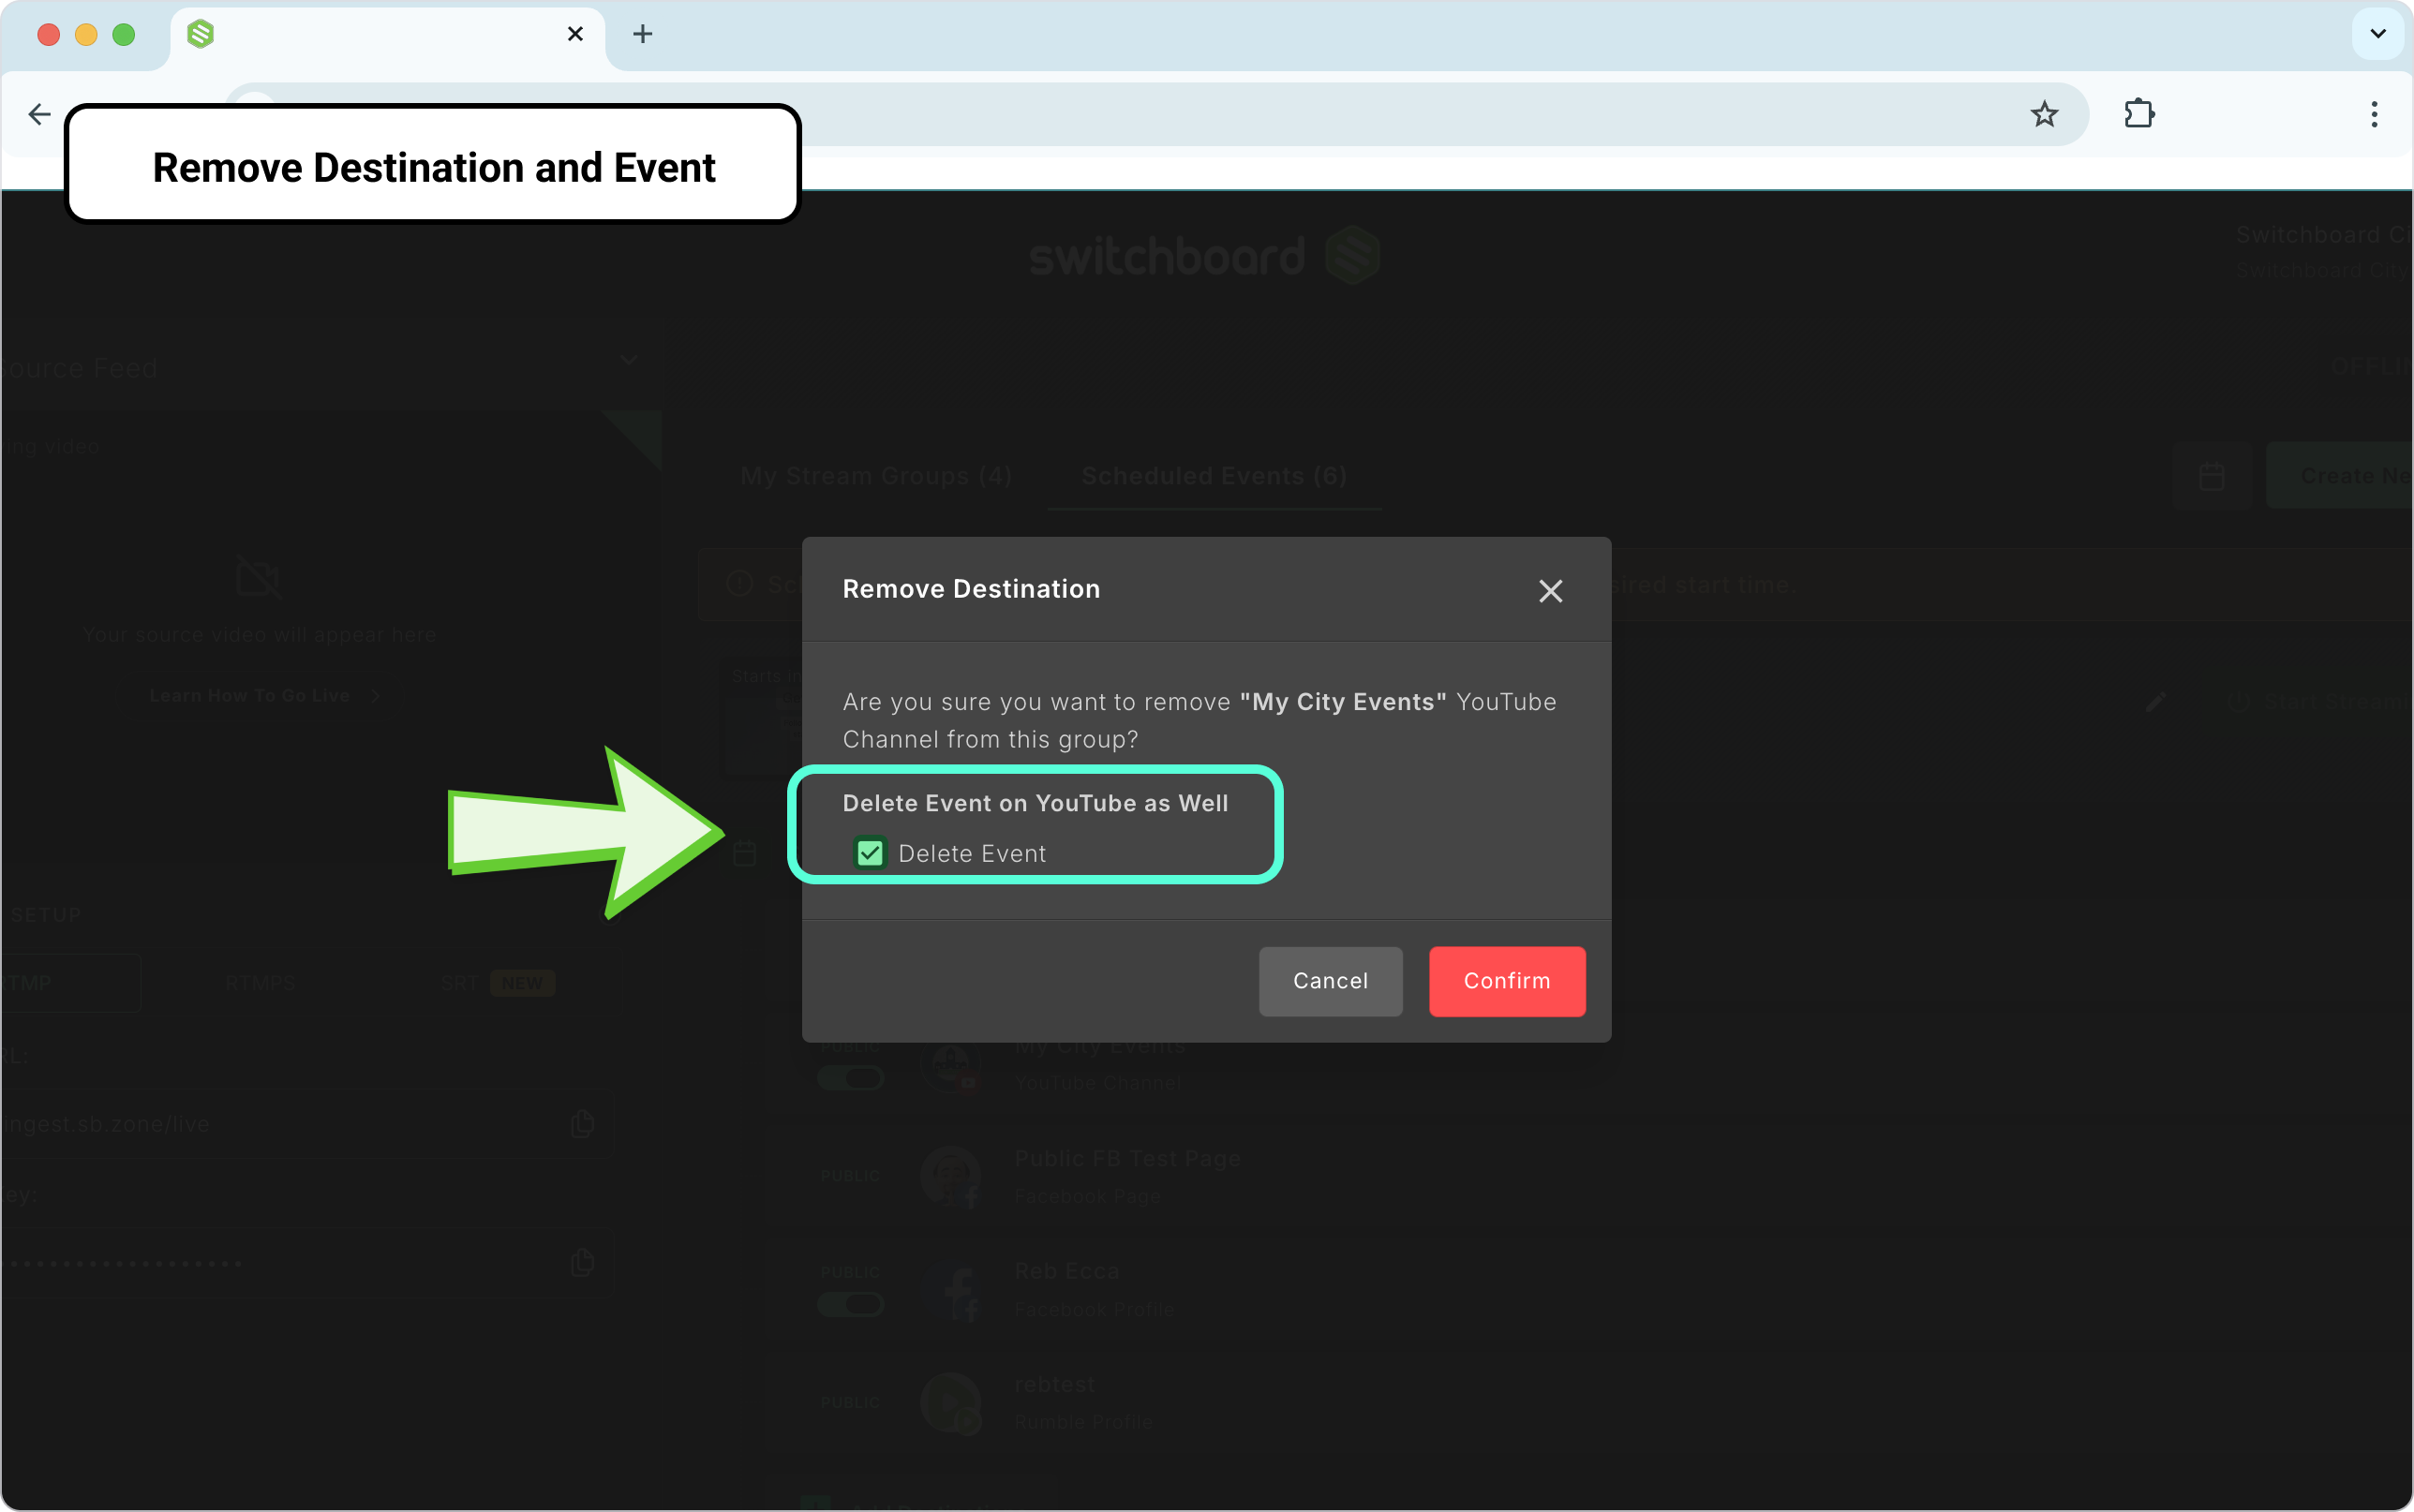
Important Note: You can remove the Destination from the Scheduled Event Group and keep the post on the Destination Platform, remove the Destination from the Scheduled Event Group only, or remove the Destination and permanently delete the public event page on that platform. Any promotional links you shared for that Destination will break, and anyone who clicked "Notify Me" will no longer be subscribed to the event.
Method 1: Quick Removal from the Workflow
This is the fastest way to remove a single Destination.
Navigate to the workflow containing your scheduled event.
Click the Three Dots next to the Destination you wish to remove.
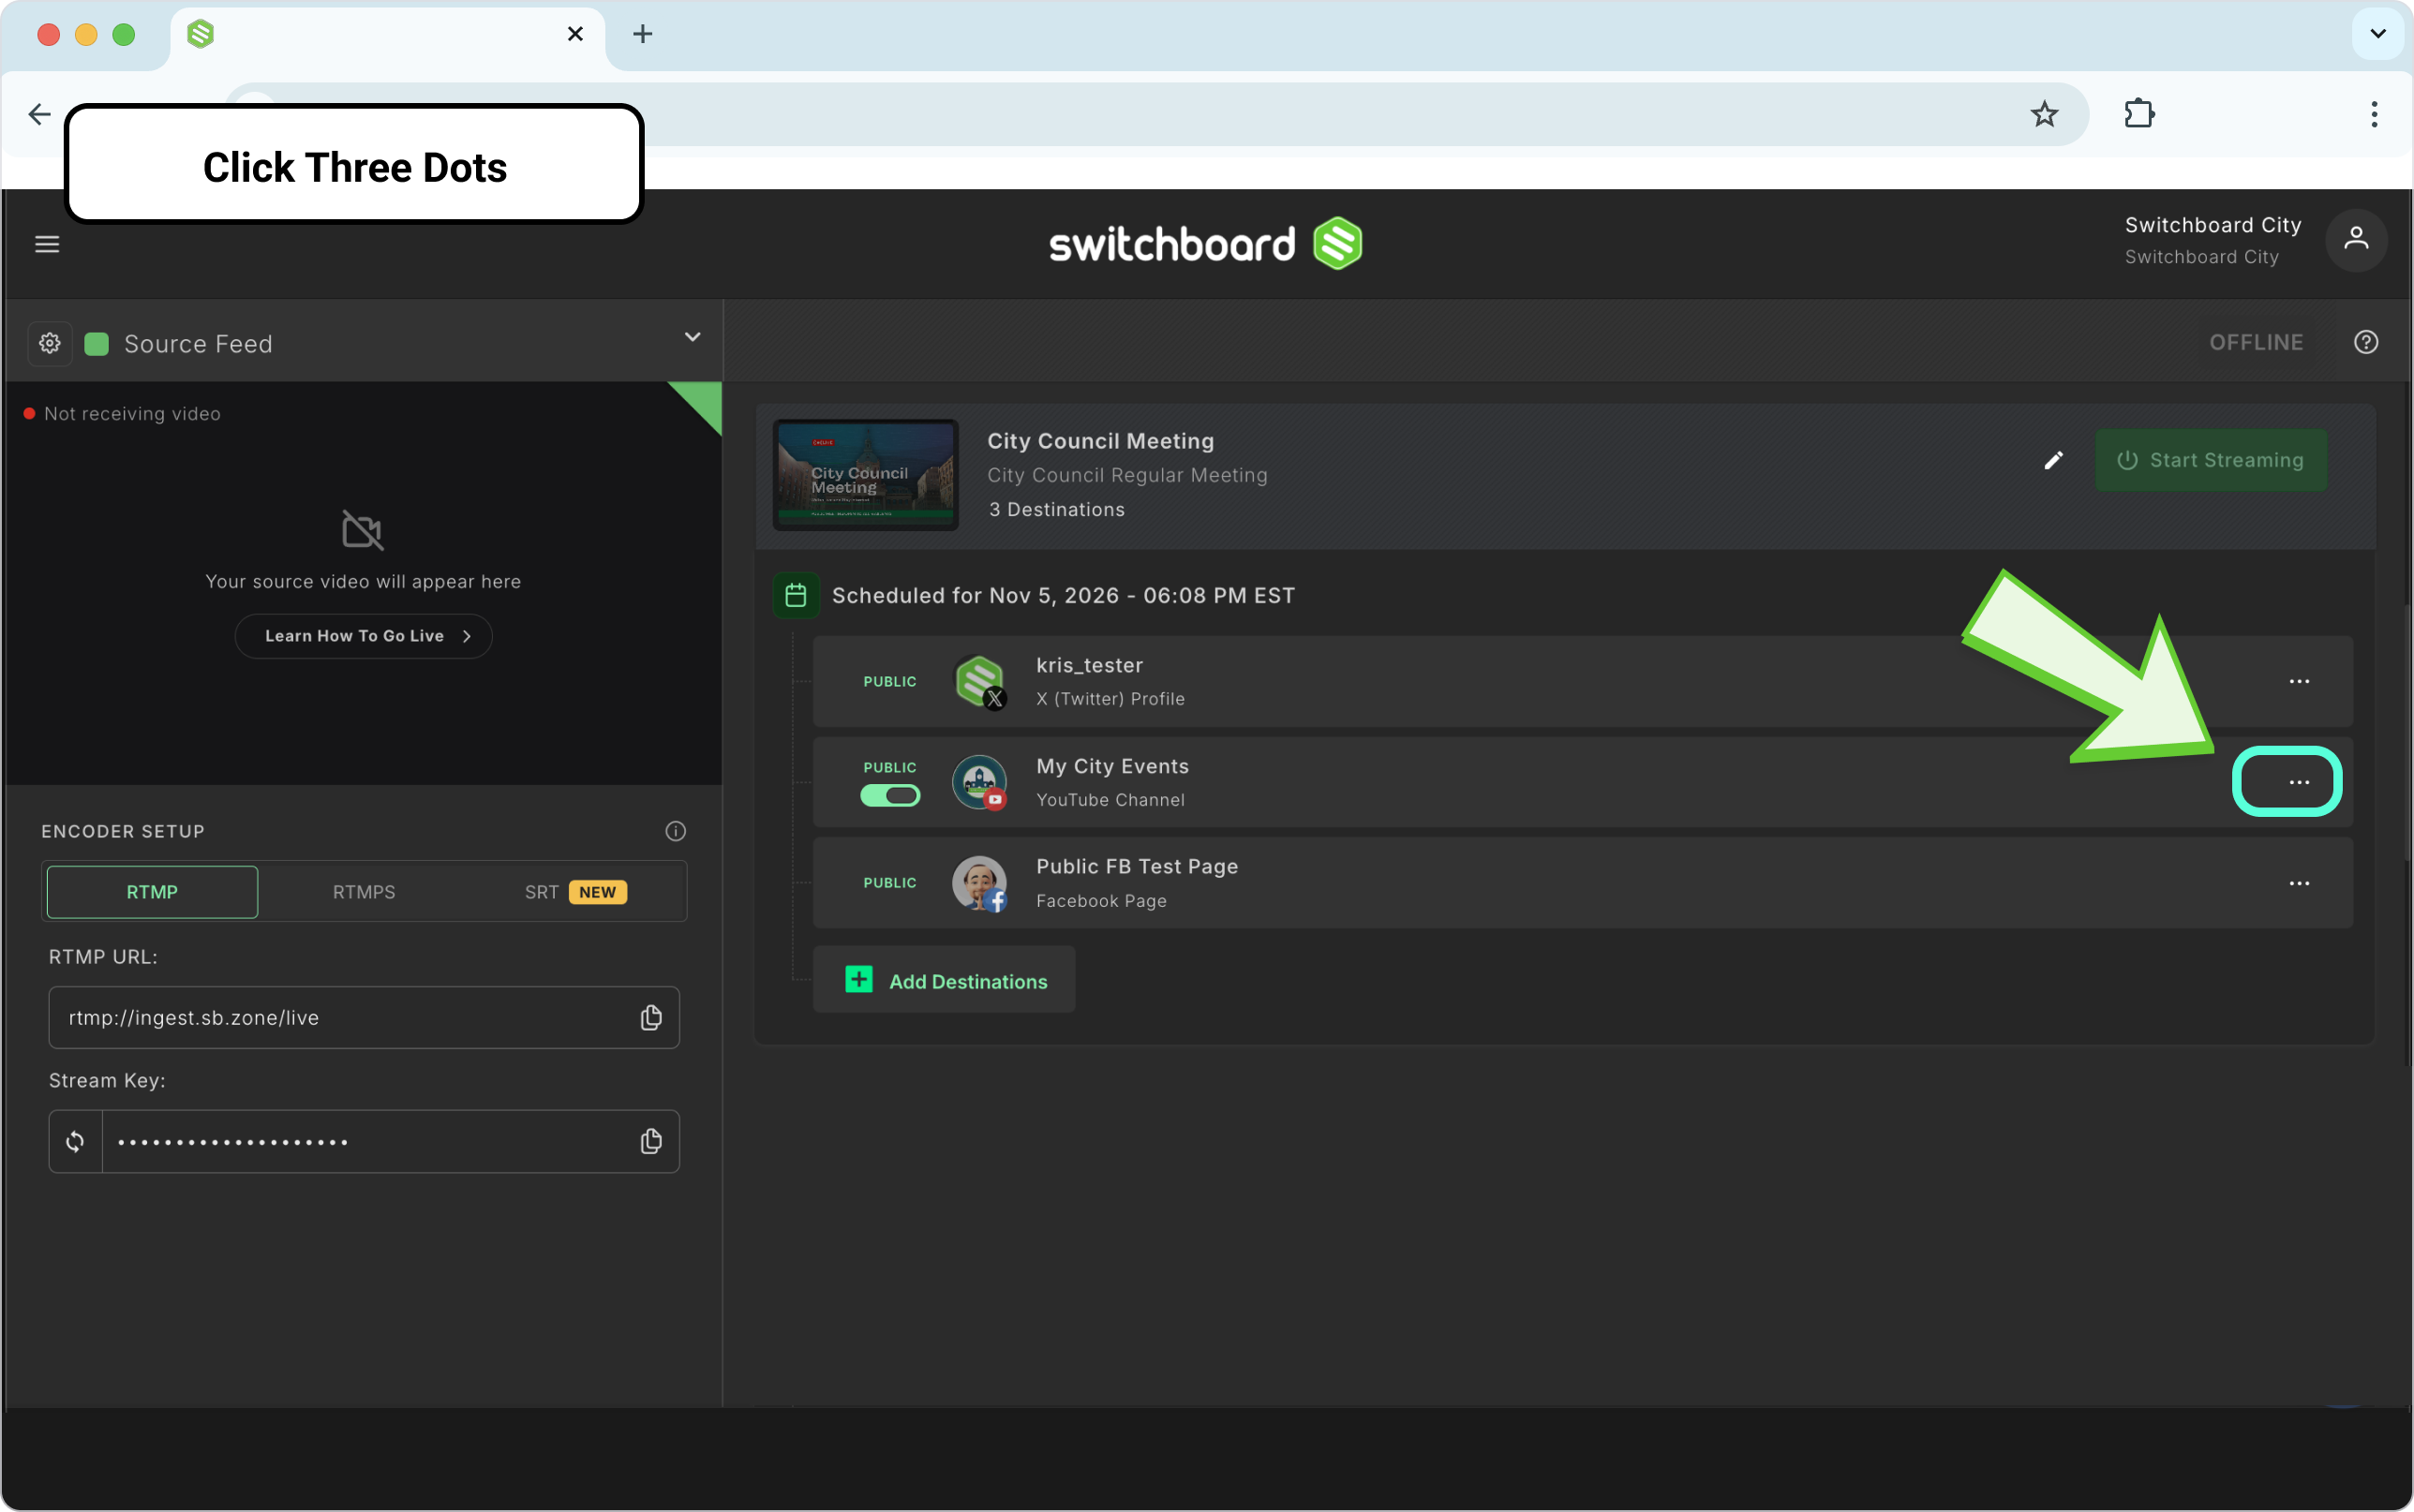
Select “Remove Destination”
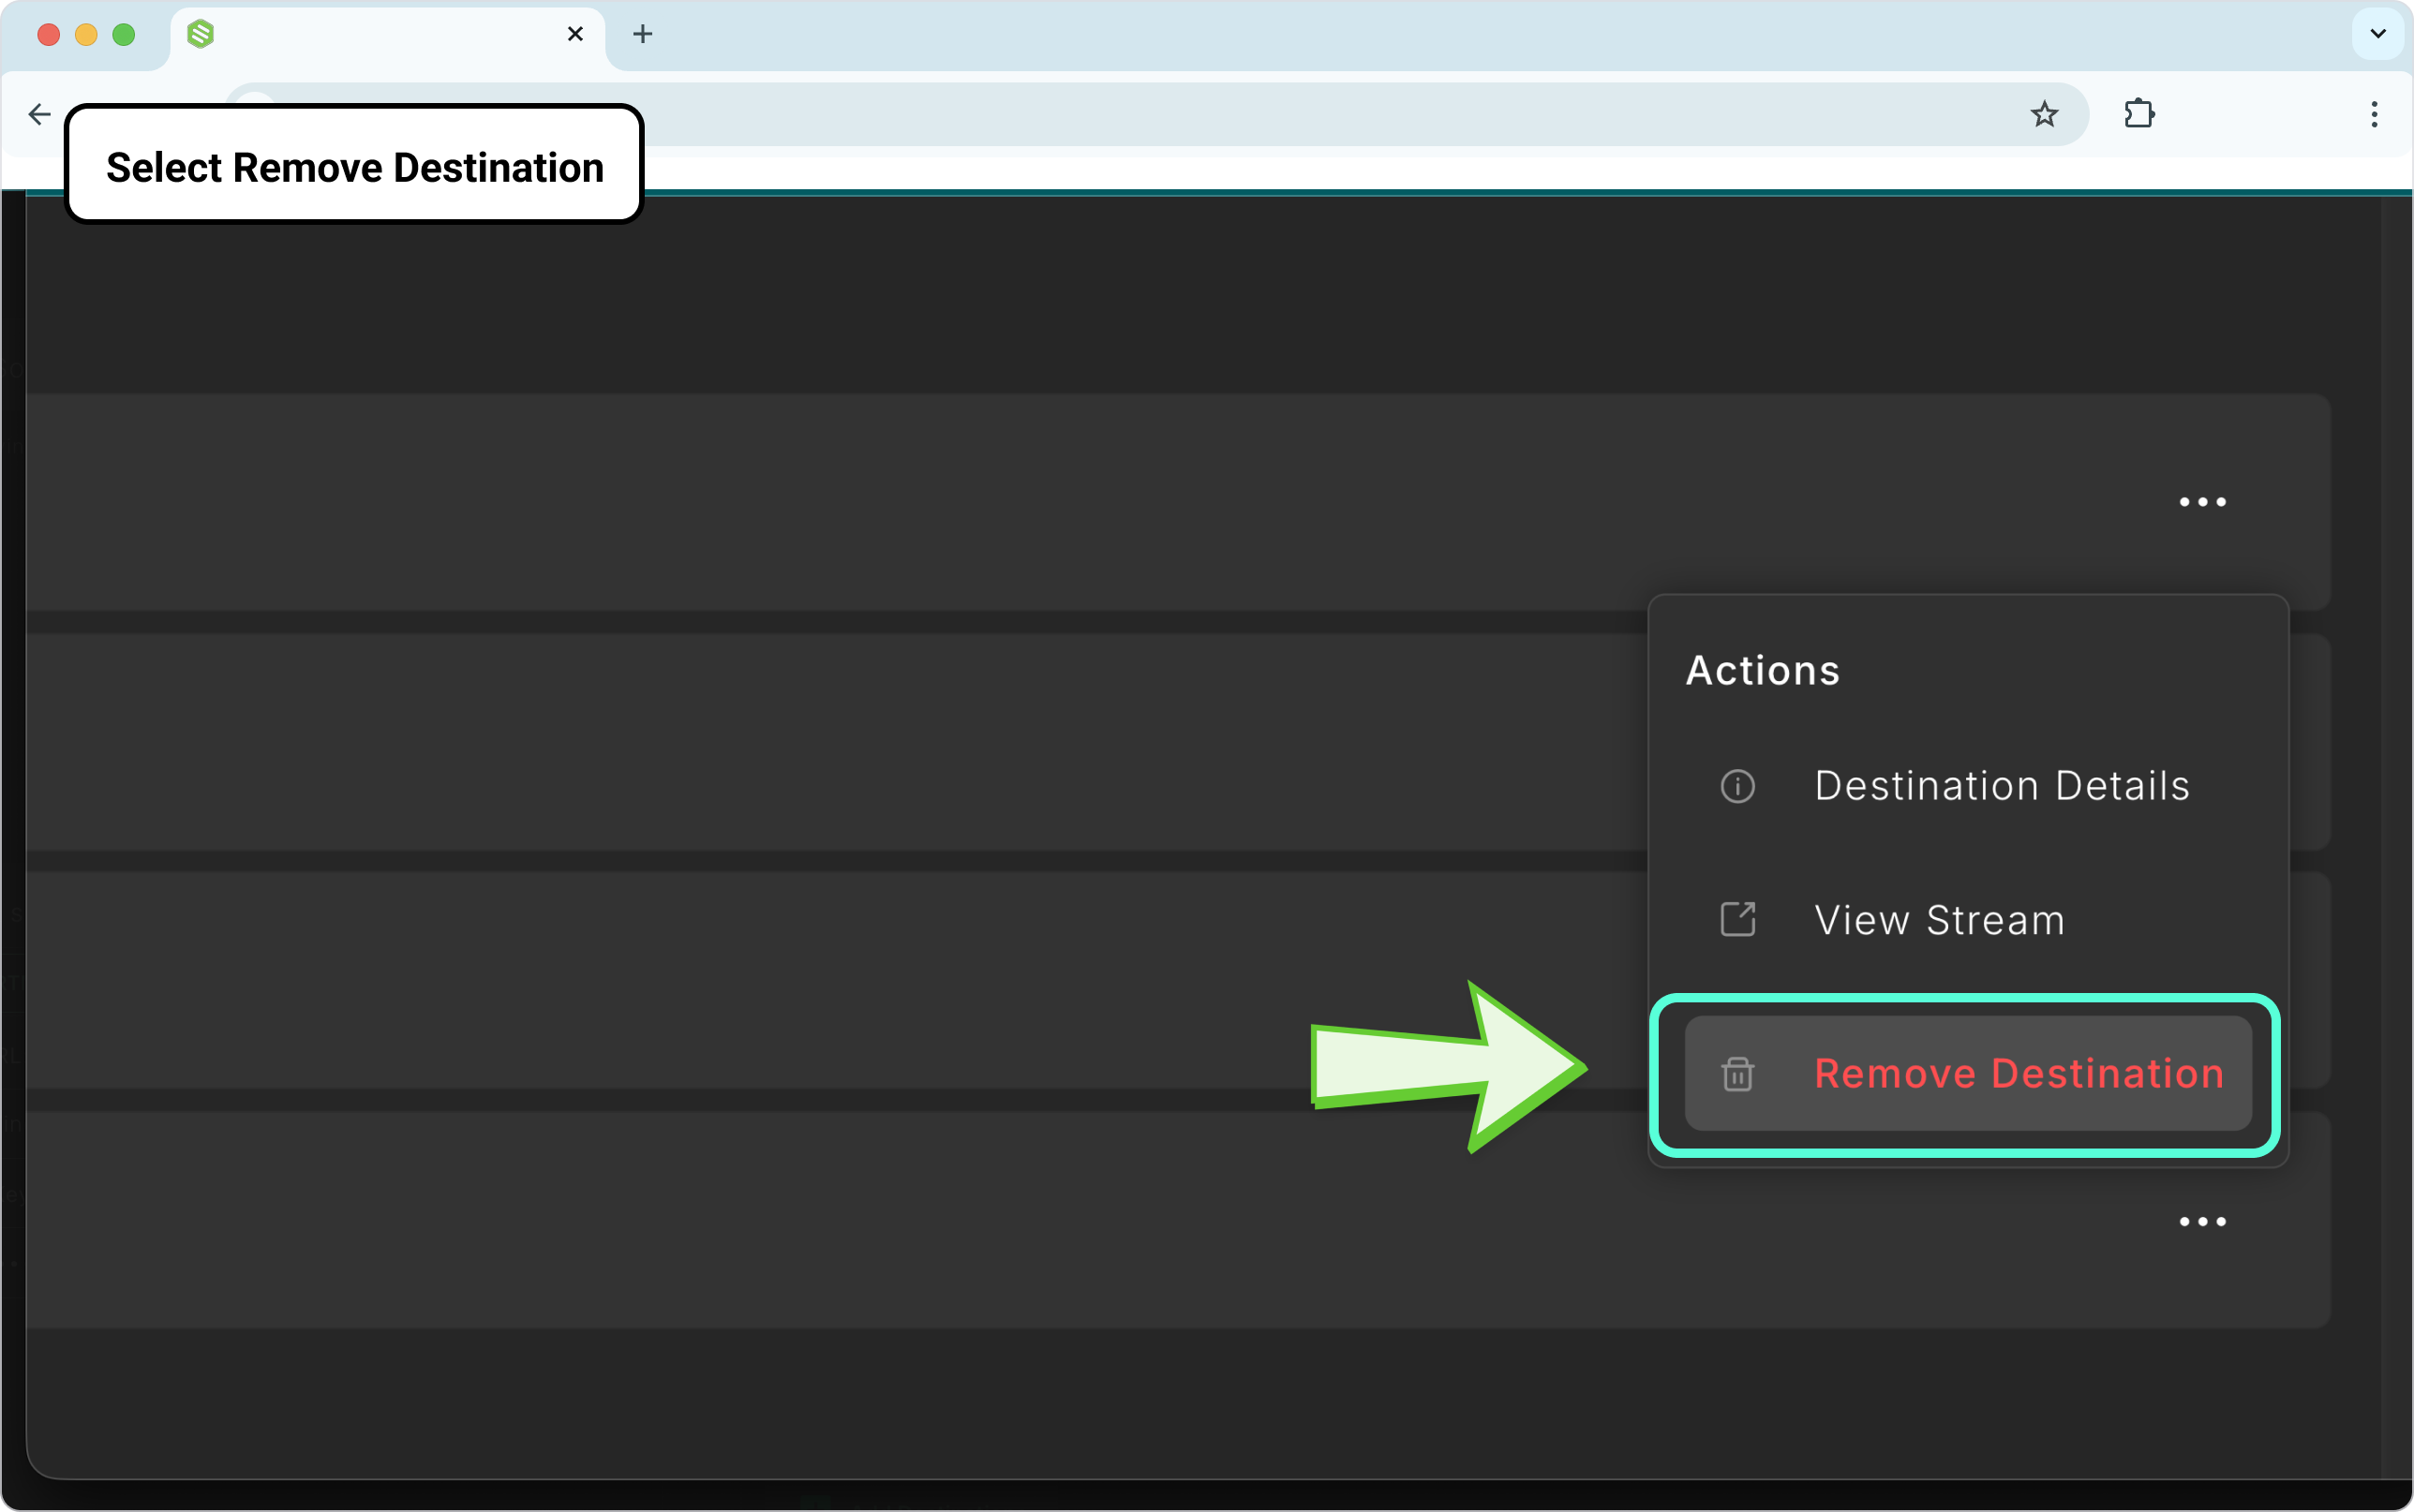
You’ll see a pop-up box to confirm your choice to remove it from the Scheduled Event. To remove the announcement post created on the Social Platform, check the box. You will then be prompted to confirm removing it from the Scheduled Event.
Method 2: Using the Edit Window from the Workflow
This method is helpful if you are already editing other event details.
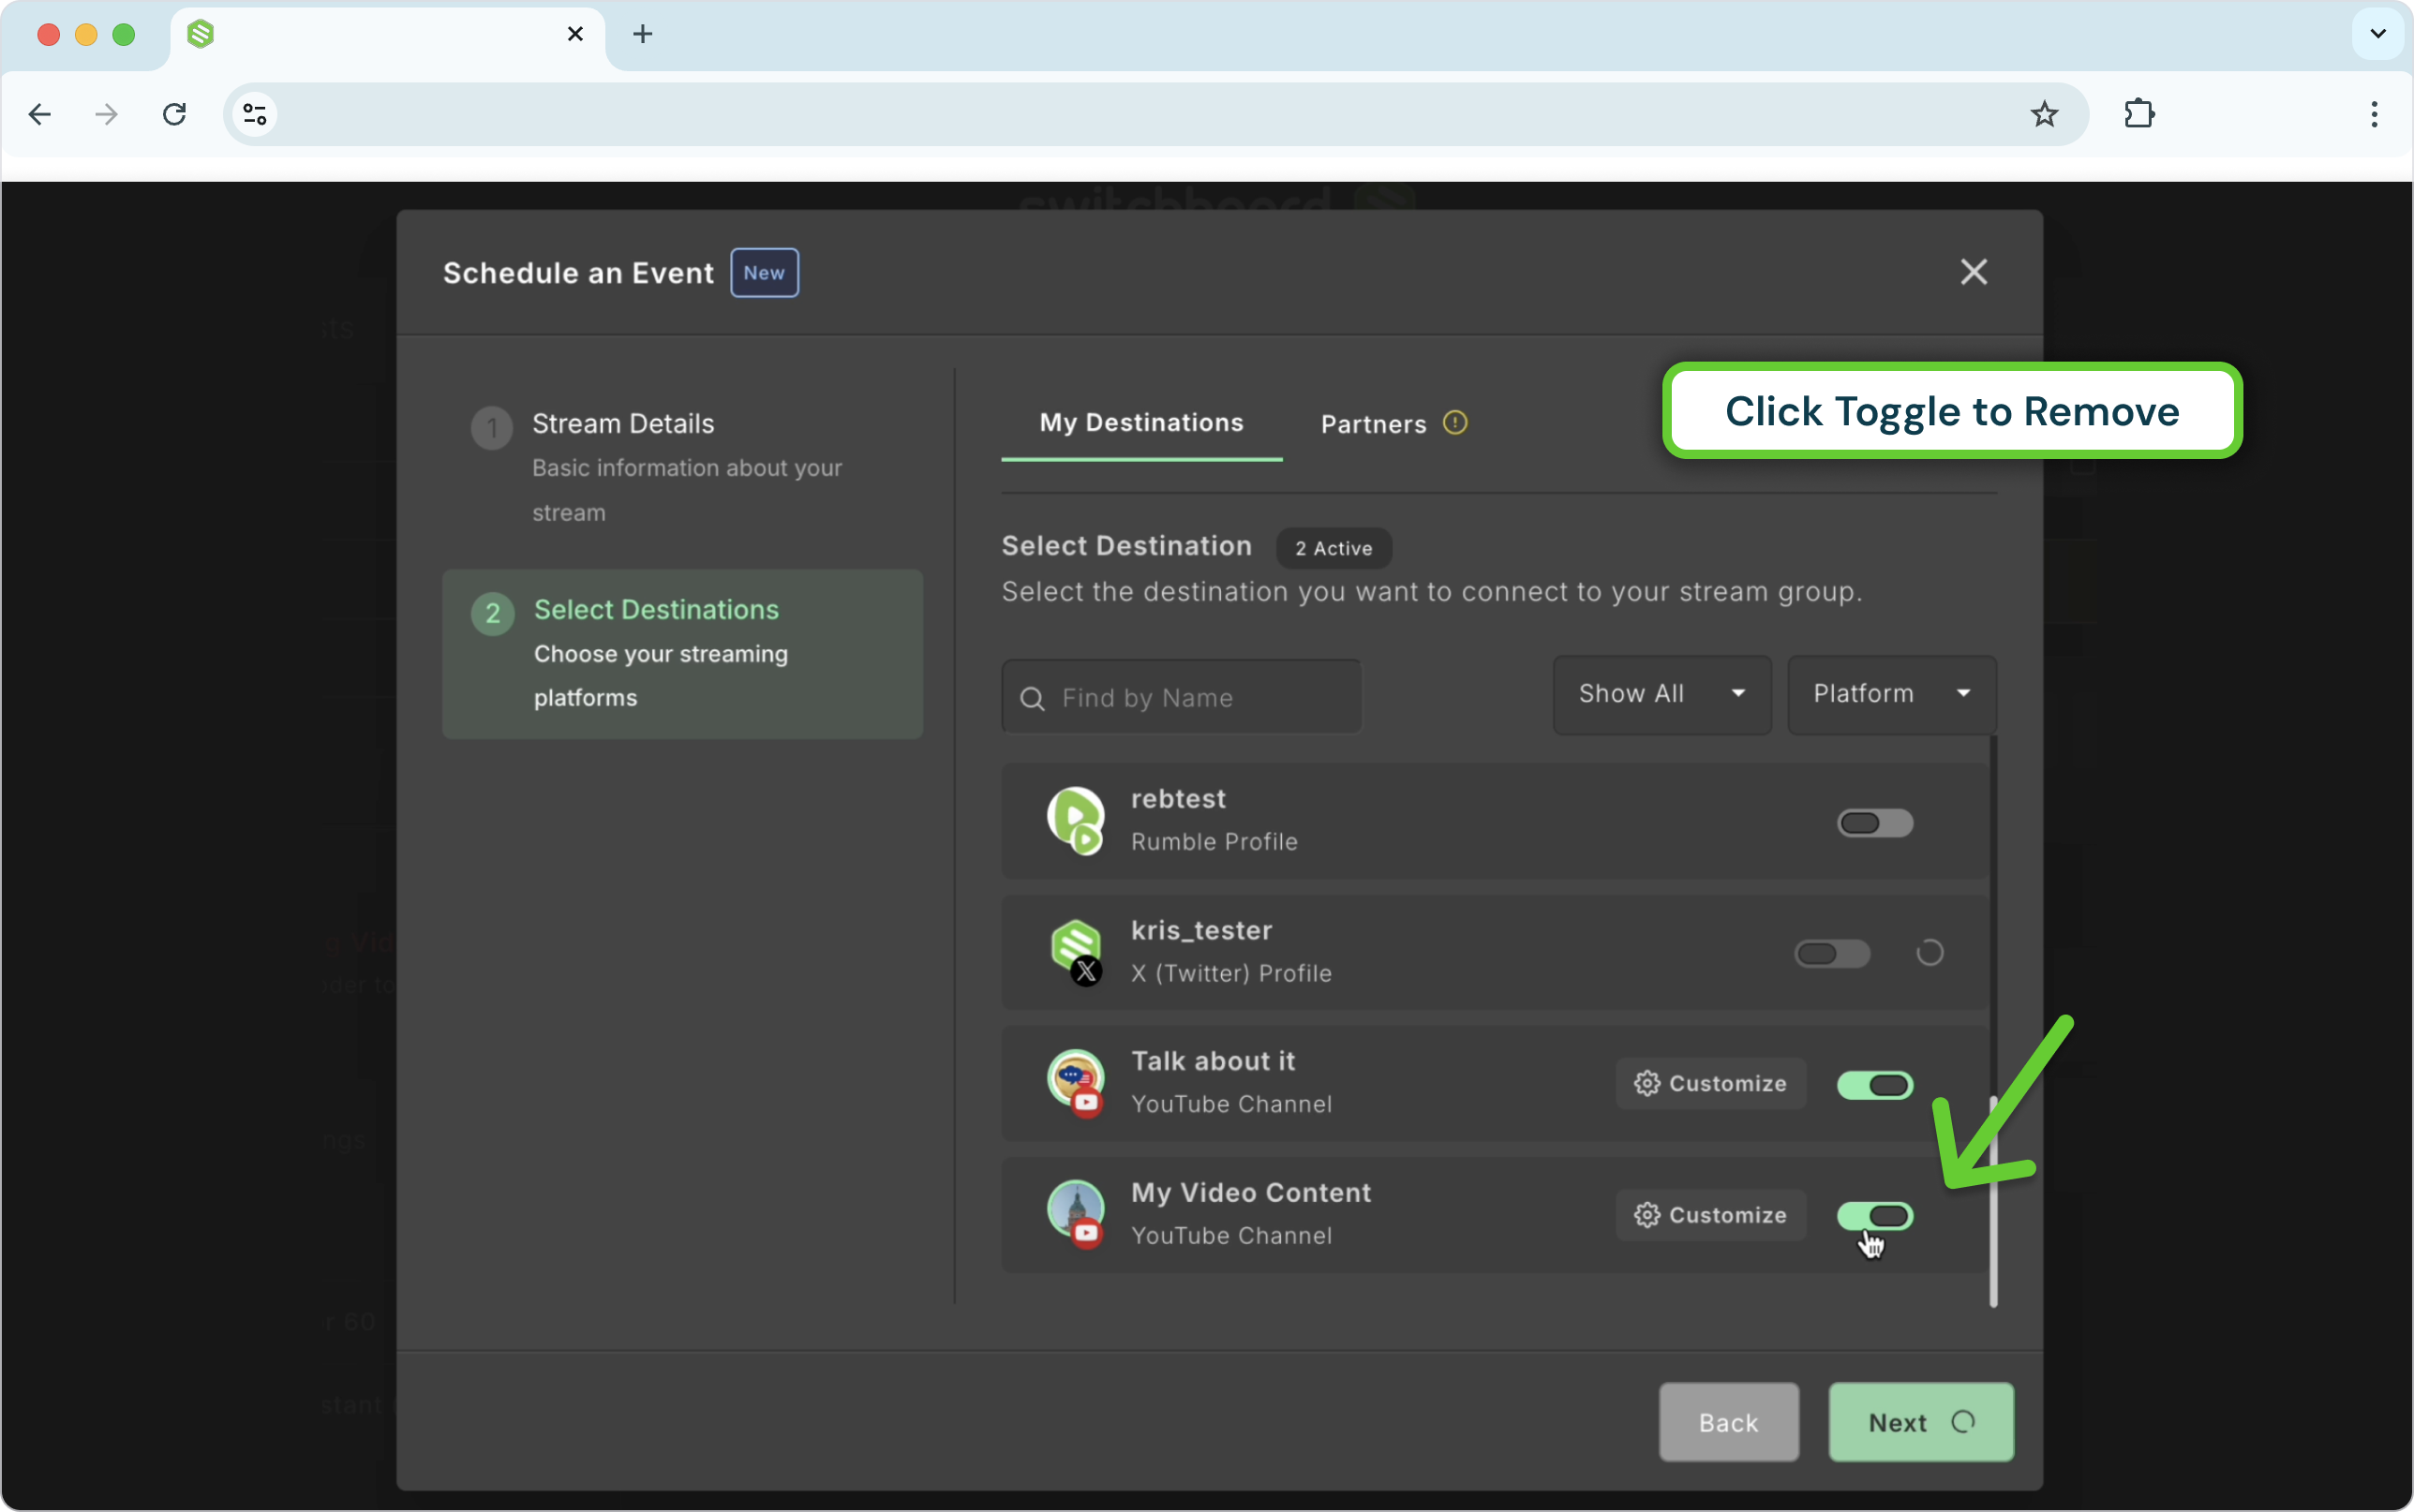
Navigate to the desired workflow and click the pencil icon in the event's header to open the edit window.
Click the toggle button next to the destination(s) you want to remove, turning it from blue (on) to grey (off).
Click Save to confirm your changes.
Method 3: Using the Events Page Manager
This method is ideal if you are managing multiple events from the main dashboard.
Open the Events Page Manager.
Find your event in the "Upcoming Events" tab and click Edit Event.
Click Save and Next to proceed to the "Add Destinations" screen.
Click the toggle button next to the destination(s) you want to remove.
Click Done to save the changes.
Updating the Thumbnail
Changing the Thumbnail is quick and Easy.
Click on the thumbnail image.
Choose a new Thumbnail.
Click Save.
Viewing Analytics
After your successful live scheduled event, you can view post-event analytics and stats for destinations that support it.
Post-event analytics aren’t available for Partner Destinations.
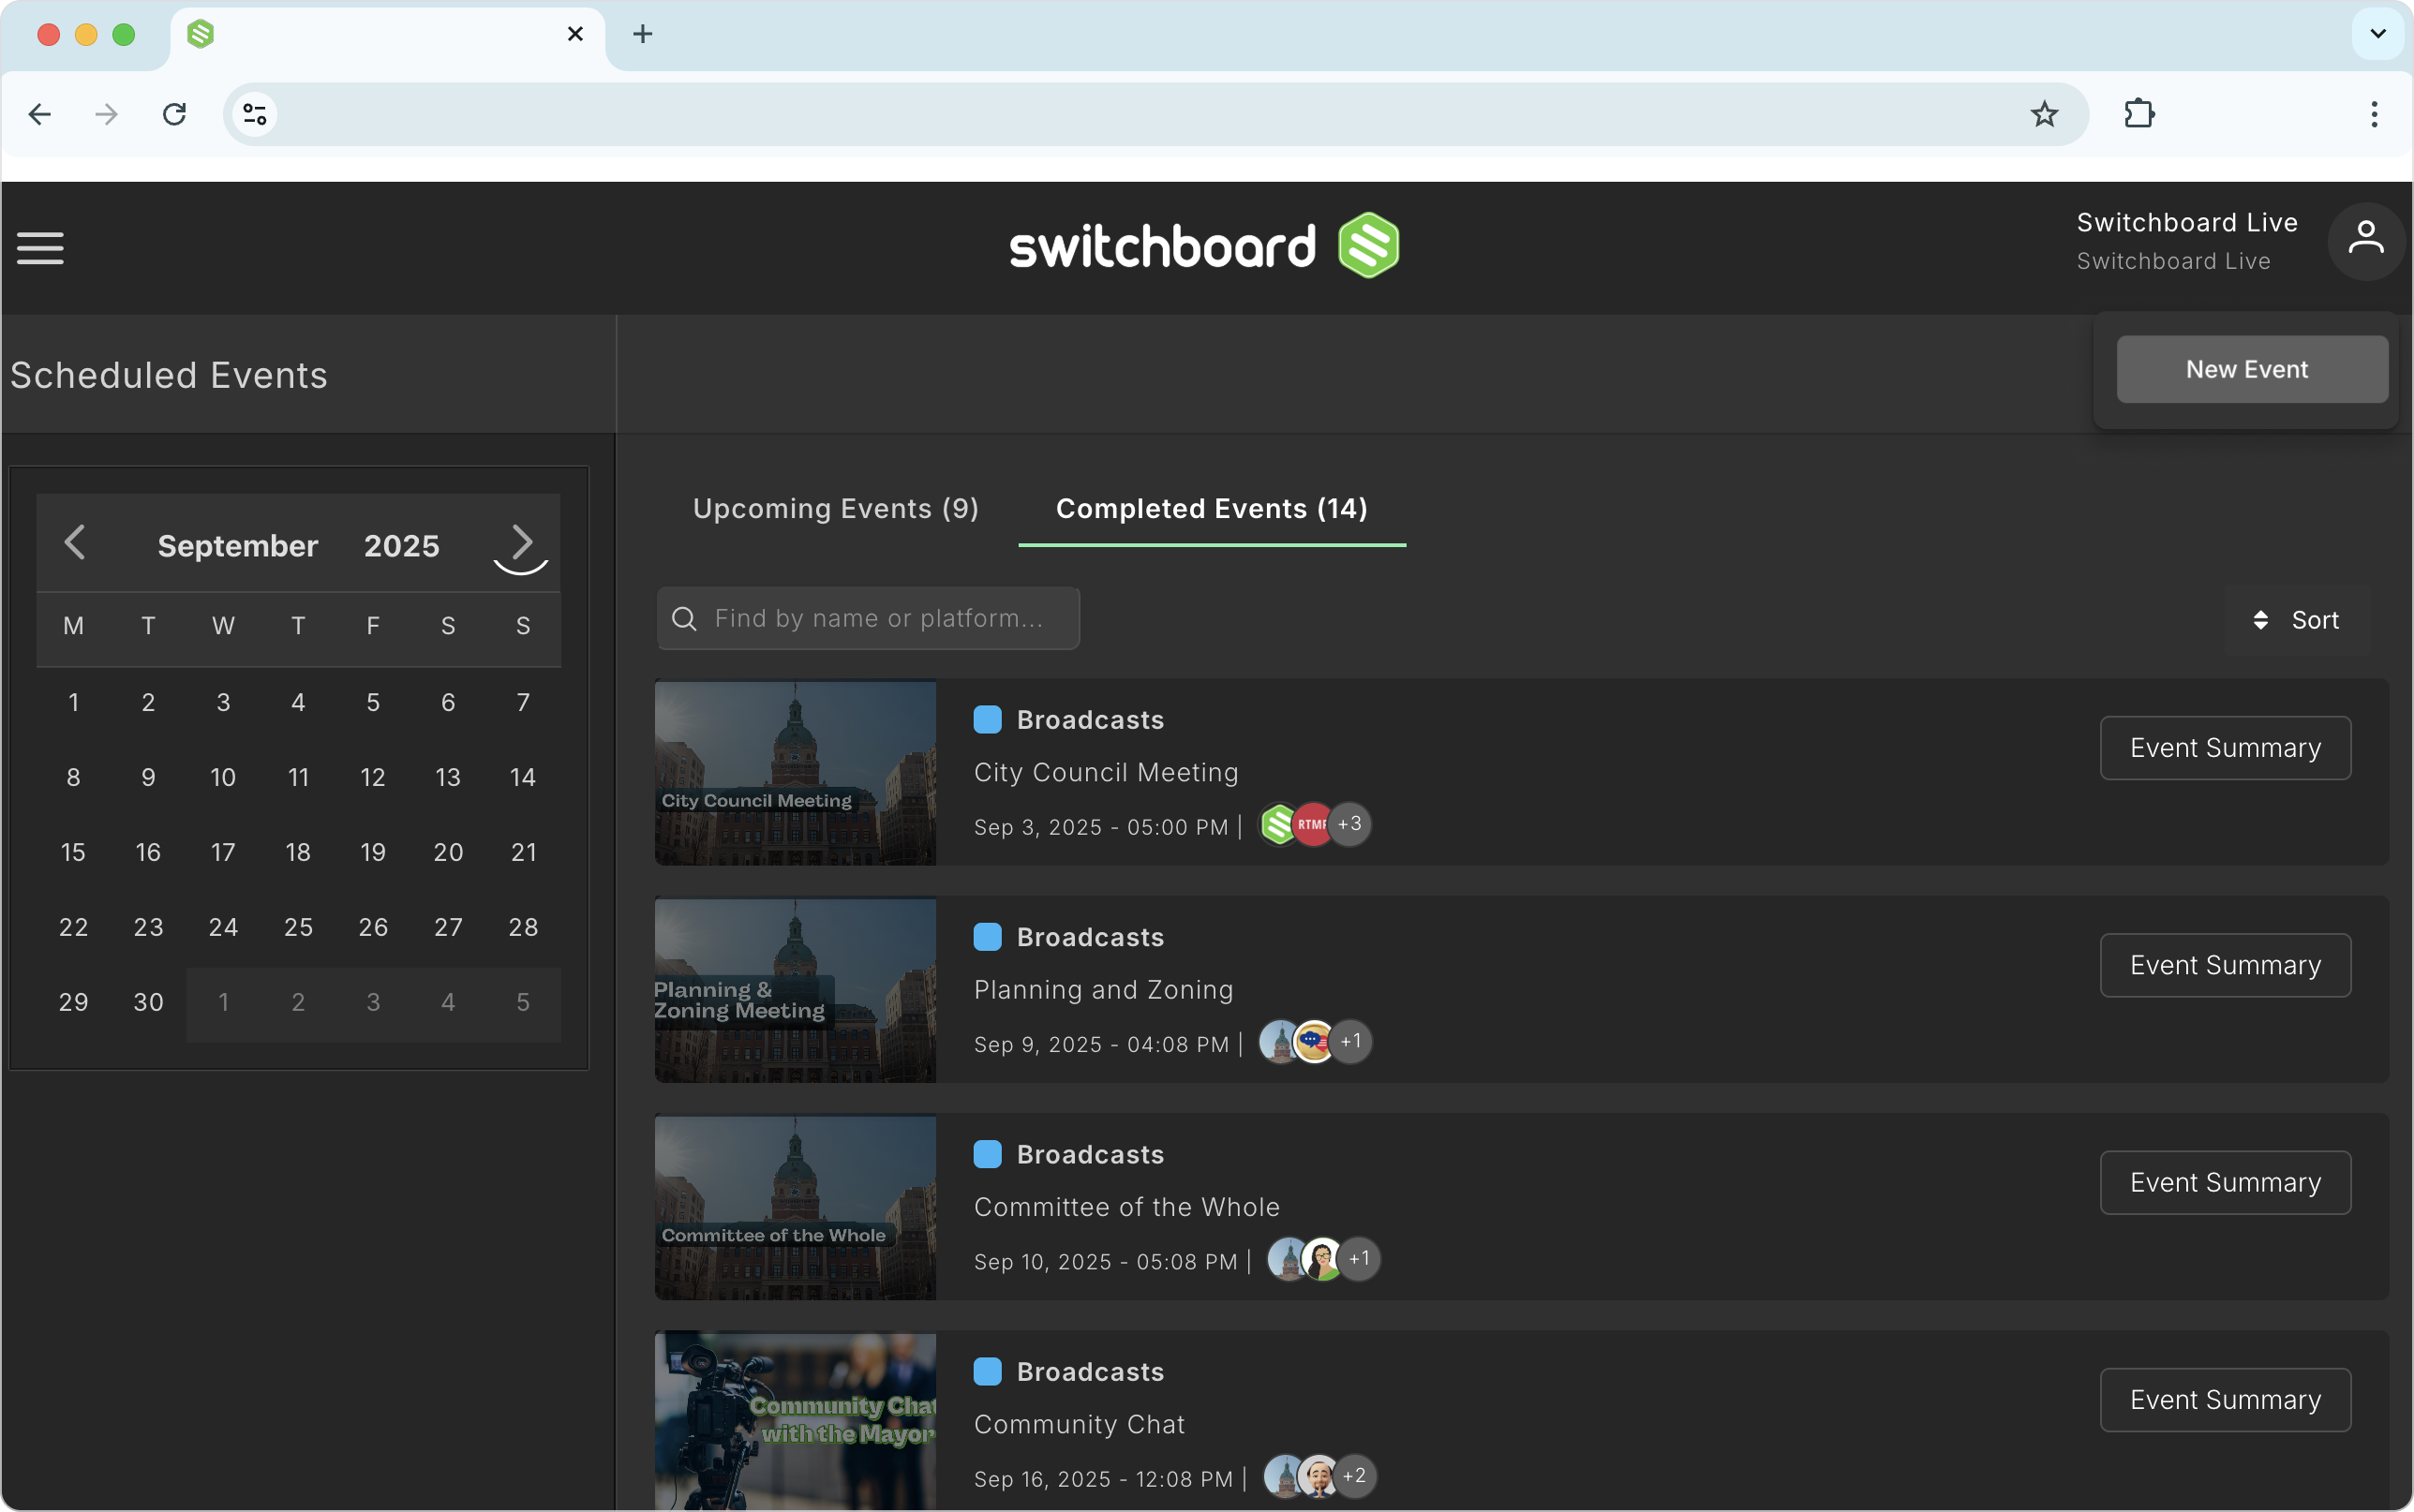
Navigate to the Events page, Main menu > Events.
Click the Completed Events tab.
Click Event Summary to view the post-event analytics of the Completed Event.
FAQ
Q: Can I schedule recurring events?
Q: Can I schedule recurring events?
A: Not yet, each event is one-time only.
Q: Will my Facebook/LinkedIn audiences see an event page?
Q: Will my Facebook/LinkedIn audiences see an event page?
A: Yes. Your LinkedIn audience will see the upcoming event announcement before you go live. For Facebook, announcements are created on Facebook Pages only.
Q: What happens if I miss my scheduled time?
Q: What happens if I miss my scheduled time?
A: The event is deleted from both Switchboard and YouTube if not started within 6 hours of the scheduled start time.
Q: Will my Scheduled Event Go Live Automatically?
Q: Will my Scheduled Event Go Live Automatically?
No. It only serves as an announcement to your viewers about an upcoming broadcast. You need to start it manually.
Q: Can I create scheduled Events for Partner Destinations?
Q: Can I create scheduled Events for Partner Destinations?
Yes, for YouTube, Facebook, X and LinkedIn destinations that have been added to the Scheduled Event.
Q: I uploaded the wrong thumbnail. How can I fix it?
Q: I uploaded the wrong thumbnail. How can I fix it?
A: Updating the Thumbnail is easy, Here’s how to change the Thumbnail.
Q: Can I link this to a live stream I already created on YouTube?
Q: Can I link this to a live stream I already created on YouTube?
A: While the Scheduled Events feature creates a new event on YouTube, you can still connect to an existing YouTube event using a different method. This involves creating a standard RTMP destination in Switchboard with the stream information from YouTube. Here’s a resource that explains those steps: How to Connect to a Scheduled YouTube Event via RTMP
Was this helpful?
Still need help? Ask the team